

My wife told me she is finally ready to own a bait casting reel after casting a Curado for Barra at Darwin.
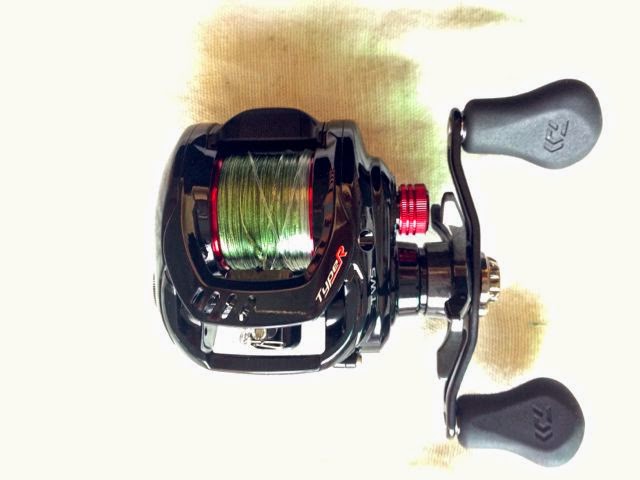
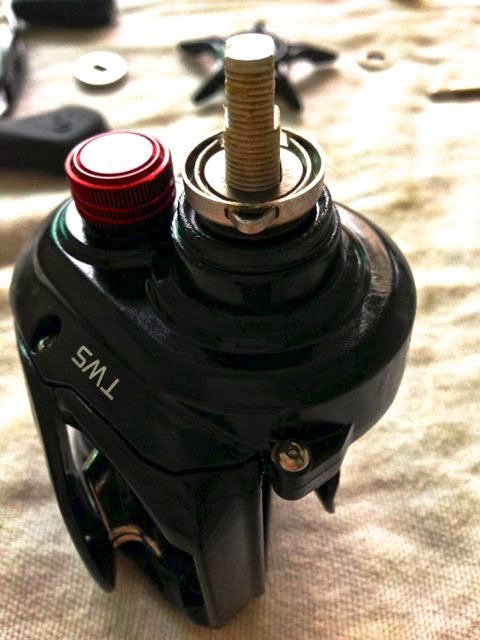
So this was what she wanted for her first reel – it is light, has a smooth and powerful drag, casts well, comes in a Left hand crank, have a high retrieve speed and is well priced for its capability. Above all, a black body with red accents to match her fishing gloves. And somehow, a Daiwa Tatula seem to fit the description.
Handsome Reel
Before we use this reel at sea, let’s crack it open to add lubricant to where is needed, and to protect the internals from galvanic corrosion with a layer of marine grease. But before we do that, let’s get the simple schematic enlarged so that we can see clearly even with greasy paws.

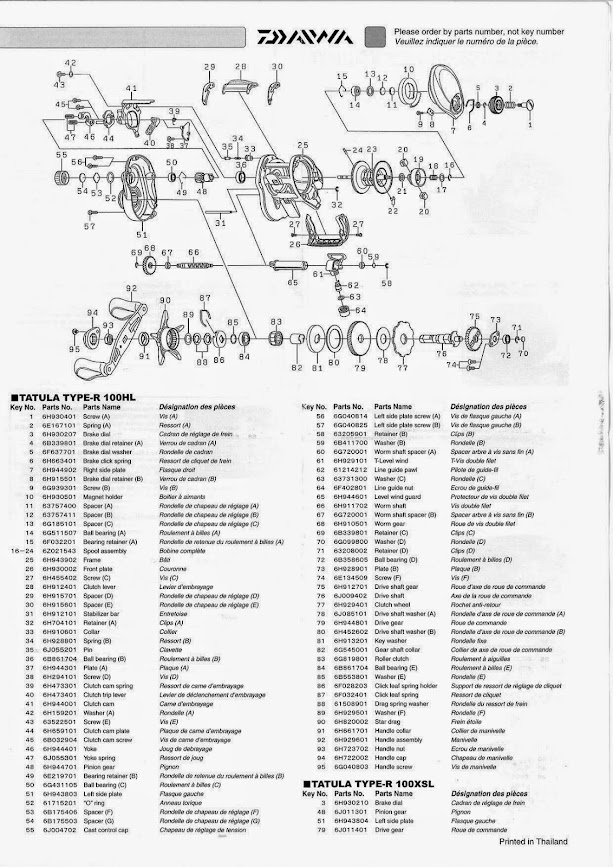
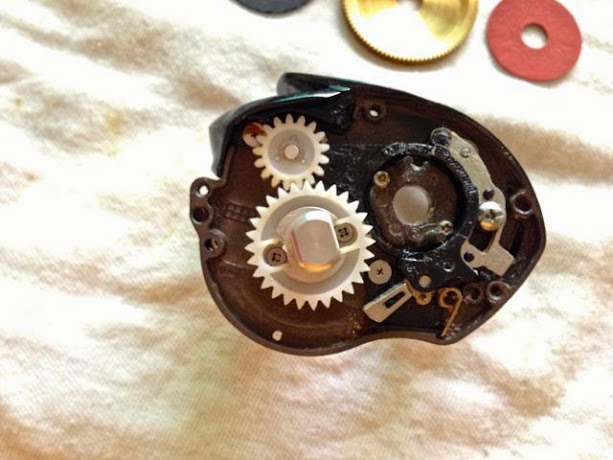
Surprisingly few parts
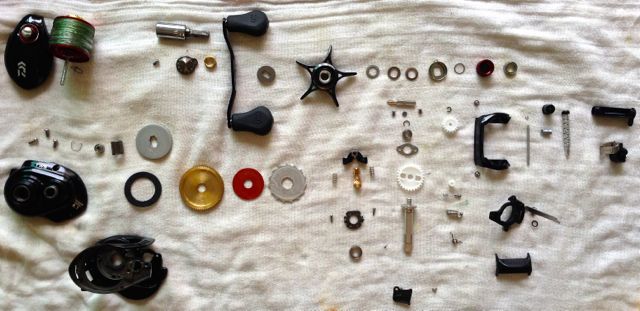
Here’s the reel with all serviceable parts taken apart. I’m pleasantly surprised that Daiwa engineers had managed to incorporate the seemingly complicated mechanism of a T Wing System into so few parts! In fact, the sum of parts in this reel is only 95 pieces. This is in my opinion a good thing. Well done, Daiwa!
However, I was disappointed to find the reel’s working parts very frugally lubricated, and the frame and side plates bone dry. Come on reel makers, when will one of you step up to deliver a reel whose frame and side plates are protected by a layer of Corrosion-X HD or even a layer of grease?

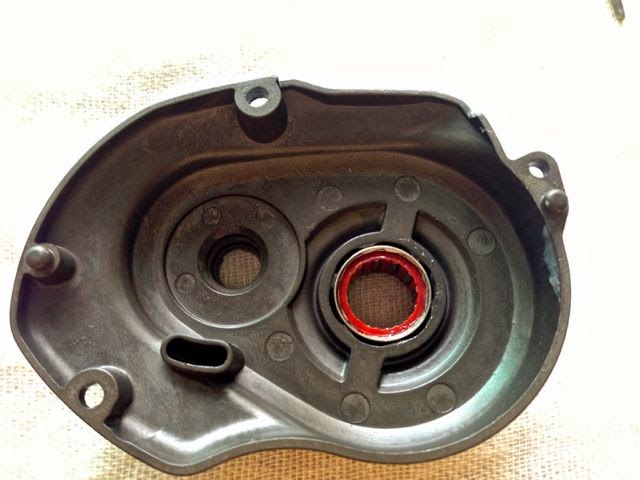
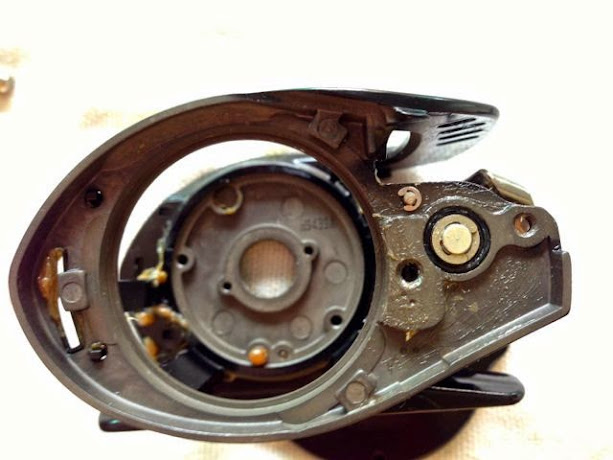
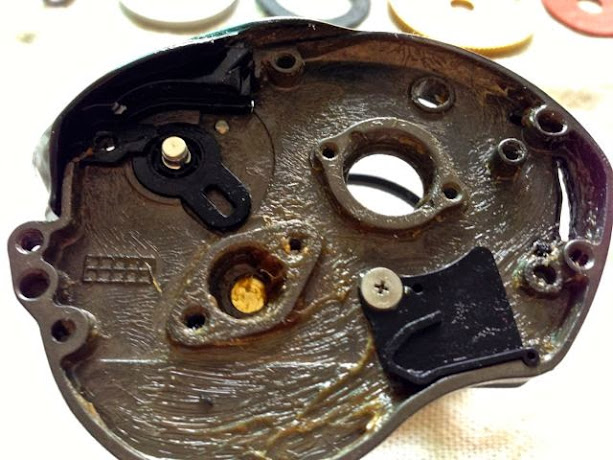
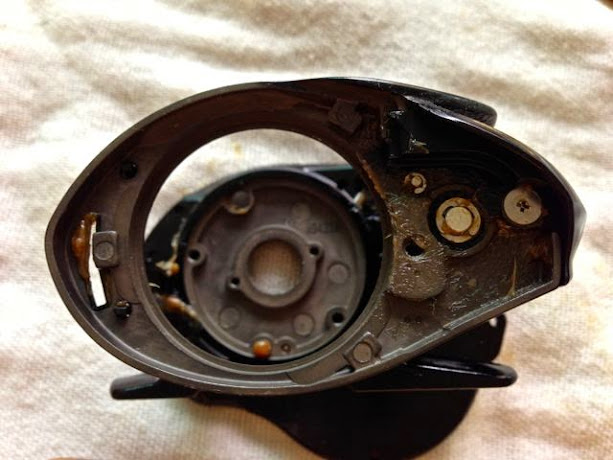
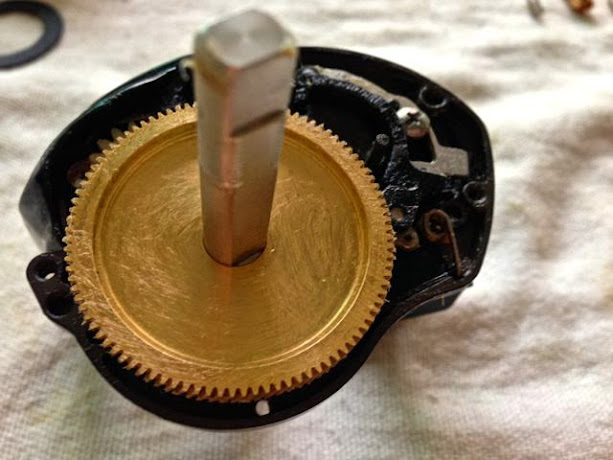
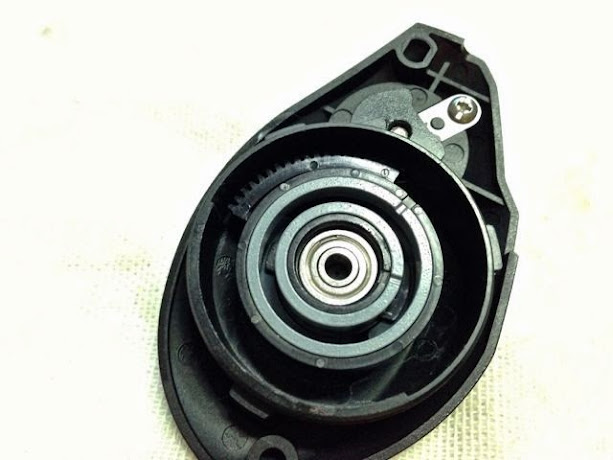
The Left Side Plate #51, was bone dry!


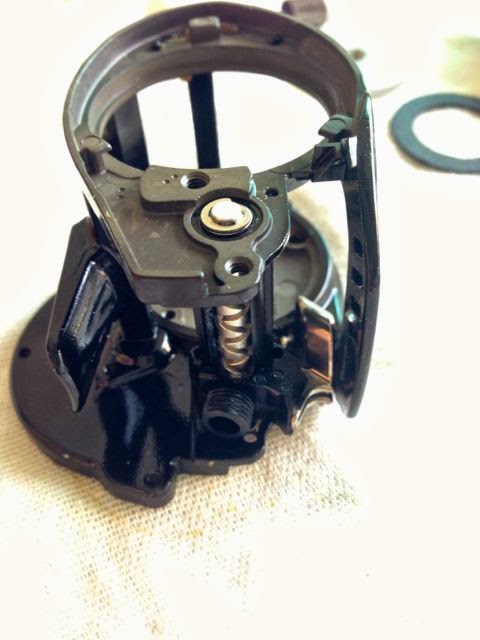
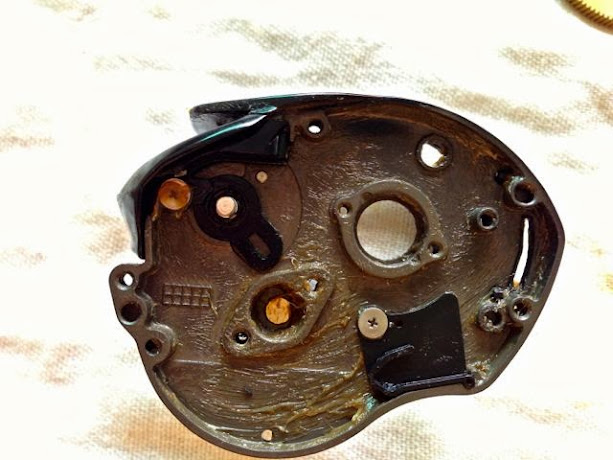
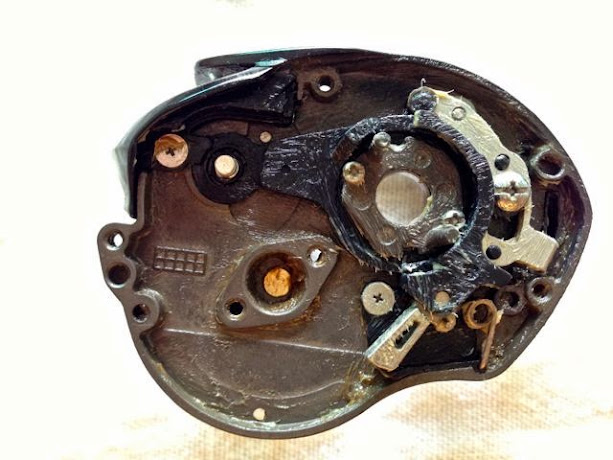
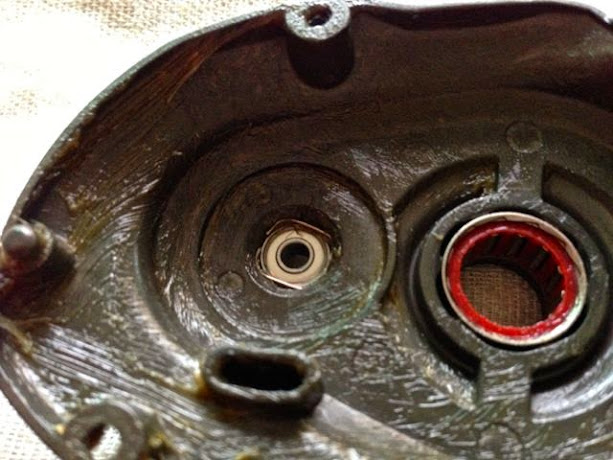
The Frame #25 was hardly better. If used in this state at sea and if cleaning is not thorough, corrosion will come knocking very quickly. I’m glad I took the step to open this reel up even before it is ever used.

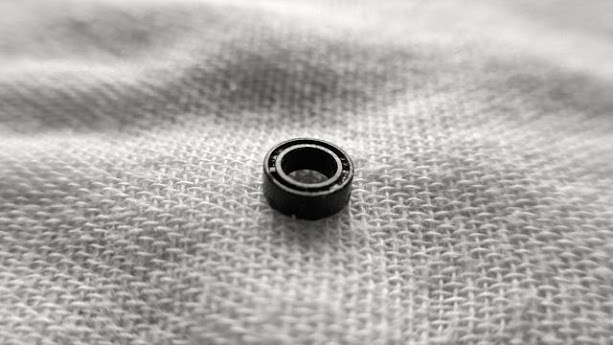

Worm Shaft Spacers A #60 and B #67 are actually black plastic pieces shaped to look like ball bearings. They can be upgraded with ball bearings, although I like it that these plastic bushings will need lesser maintenance than ball bearings unless they are upgraded to fully ceramic ball bearings. For those who are thinking of upgrading these to Ball Bearings, the size is 7mm x 4mm x 2.5mm (OD x ID x thickness).

I begin by painting on a layer of marine grease at areas like joints and corners where salt water can enter and start to cause galvanic corrosion if the salt is not effectively expelled. I found that my leftover tube of Quicksilver 2-4-C Marine Grease works excellently for this purpose. You can however use any brand of marine grease to protect your reel.
As I don’t intend to frequently peel open the Clutch Lever Spacers #29 and #30 to clean underneath, I gave it a thicker coat of 2-4-C Marine Grease and then snap back Spacers #29 and #30.


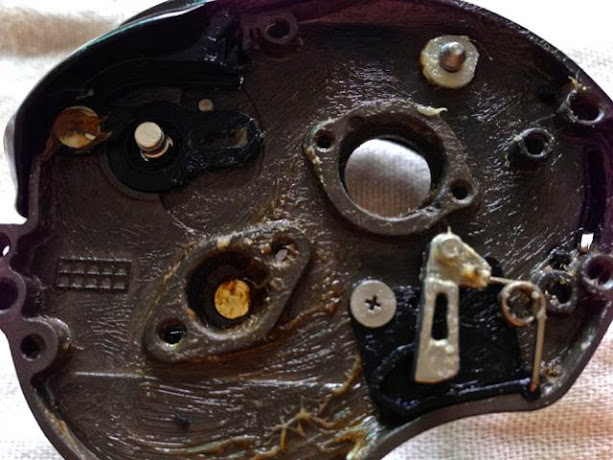
With a stiff bristled brush, I paint on 2-4-C Marine Grease to protect the Frame #25, taking care to also coat all corners, nooks and crannies.

Fasten black plastic Plate A #37 with Screw D #38.


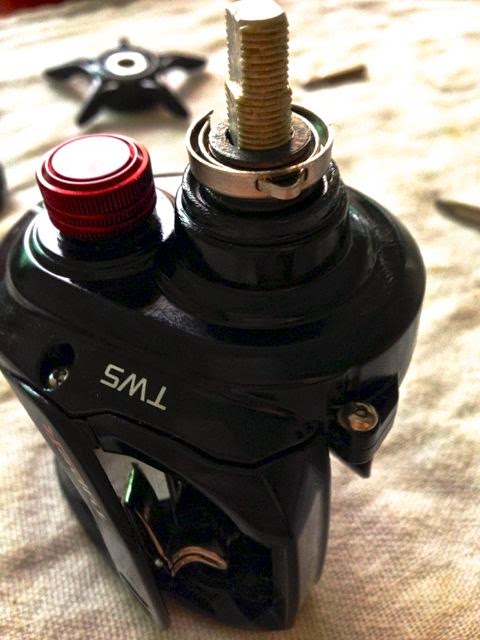
Slide Level Wind Guard #65, through Frame #25 and T-Level Wind #61.
A Word of Caution
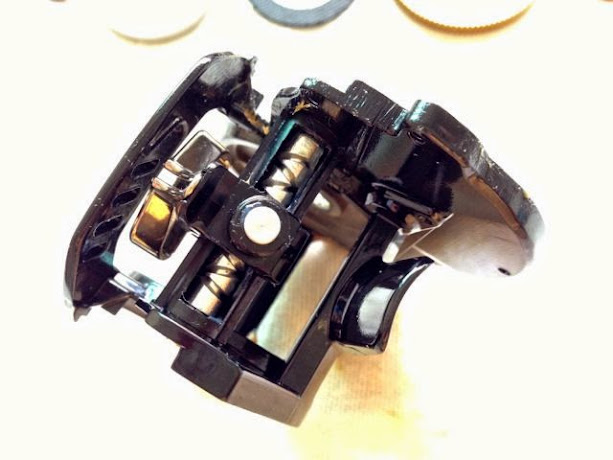
Looks can be deceiving. Although this reel may have fewer parts than most other low profile baitcasters, we nevertheless need to make a complicated, spring-loaded connection between the Clutch Lever #28, Clutch Cam #41, Clutch Cam Spring #39, Clutch Trip Lever #40, Level Wind Guard #65 and supported by spring loaded Collar #33 and #34. Phew! Just reading the lot of names have already made me giddy with confusion. That’s surely a lot to connect concurrently, and when springs have a macabre desire to fly off to oblivion and grease-slick fingers do a poor job of holding the whole shebang together, I’d suggest that you’d first wipe the grease off your hands, on a rag moistened with Simple Green, then undertake the manoeuvre under the protection of a clear plastic bag, so should the inadvertent happen, it will not be followed by a cuss word and a long detour to vacuum clean the room.
Insert Worm Shaft Spacer B #67 into the end of Level Wind Guard #65.

Flip Frame #25 over. Attach Worm Shaft Spacer A #60 and Washer B #59 to the round end of Worm Shaft #66, then secure with Retainer B #58. Grease with a light grease and drop it in Level Wind Guard #65 from the right hand side of the Frame #25. If you are doing a RH crank reel, then it’s the left side.

Insert Line Guide Pawl #62 into T-Level Wind #61. Wiggle it around to ensure Line Guide Pawl #62 tracks positively with Worm Shaft #66.


Insert Washer C #63 into Line Guide Nut #64 and secure to T-Level Wind #61. Tighten snug, taking care not to over torque.


Insert Stabiliser Bar #31 through frame.

Secure Stabiliser Bar #31 with Retainer A #32.

Protect the insides of Front Plate #26 with Quicksilver 2-4-C Marine Grease and attach to Frame #25.

Secure on both sides with Screw C #27.


Slip Clutch Lever #28 between Spacer D #29 and Spacer E #30.


Insert the tag end on the long side of Clutch Cam Spring #39 into hole in Plate A #37.


Grease and insert shorter end of Clutch Cam Spring #39 into hole in Clutch Trip Lever #40.


Insert white plastic Collar #33 into hole in Frame #25.

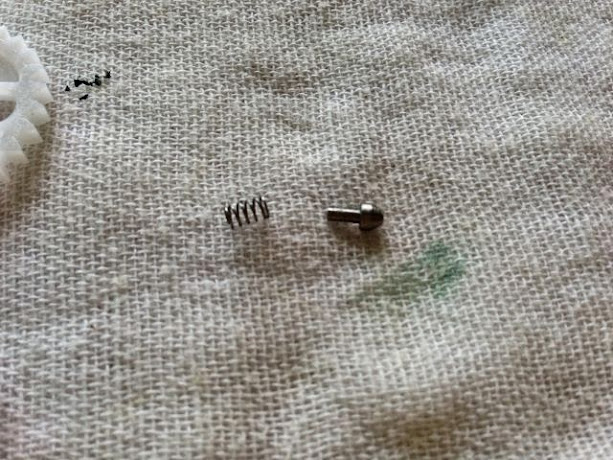
These tiny Spring #34 and Pin #35 will sit within Collar #33. To prevent them from getting too jumpy, I slow them down with a dab of regular Cal’s Universal Reel and Drag Grease (Gold Label).


Insert Spring #34 into Collar #33.

Insert Pin #35 into Spring #34.
CAUTION: Flying Springs. Install within a clear plastic bag

This is going to be the single most challenging part of the whole installation, so I took a break to make sure I’m alert and sharp before I attempted this step.
Grease Clutch Cam #41 with a lubricating grease such as Cal’s Grease. Insert the metal shaft through Clutch Lever #28, at the same time, connecting a stub on the underside of its plastic arm to Level Wind Guard #65, a hole in its plastic body will accommodate the bar on Clutch Trip Lever #40. However all these parts will not connect, until you load up on Clutch Cam Spring #39, slip Clutch Cam #41 into its housing, and press Pin #35 into its housing in Collar #33. You’d wish you had as many hands as an octopus for this.
When you have succeeded in connecting all the components, slip Washer A #42 over Screw E #43 and secure Clutch Cam #41 with them. Before you fully tighten Screw E #43, carefully work your Clutch Lever #28 to ensure that it operates the TWS system, and the Clutch Trip Lever #40 smoothly. Finally, tighten firmly using a flat slot screwdriver.
That’s the end of the ordeal! If you had taken the steps to carefully grease and protect all the parts with marine grease, you would not have to go through this step again for at least a year if you treat your reel well by carefully neutralising sea water with Salt-X and rinsing with fresh water after every trip.


Lubricate Ball Bearing B #36 with CorrosionX and install. For those who are able to get a full ceramic bearing to replace this, the size is 12mm x 8mm x 3.5mm (OD x ID x thickness). A full ceramic bearing is saltwater corrosion proof, so you need not strip this bearing out to clean after every saltwater excursion.

Note the shaped pegs on Clutch Cam Plate #44 correspond to holes in the Frame #25. The flat edge should be facing the Drive Shaft #76 when installed correctly.

Grease and install Clutch Cam Plate #44, secure with two Clutch Cam Screws #45.


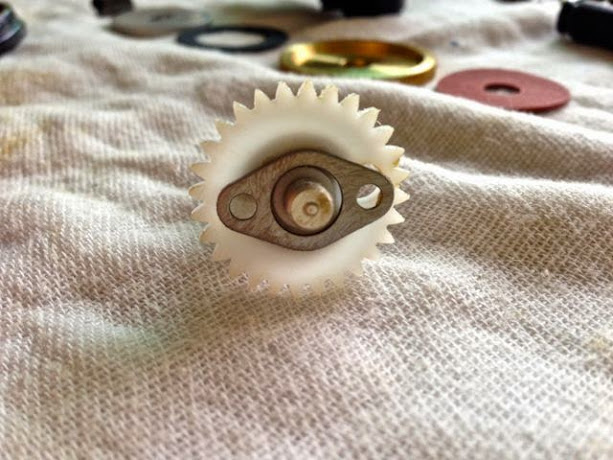
Mate white plastic Worm Gear #68 to the keyed shaft of Worm Shaft #66.

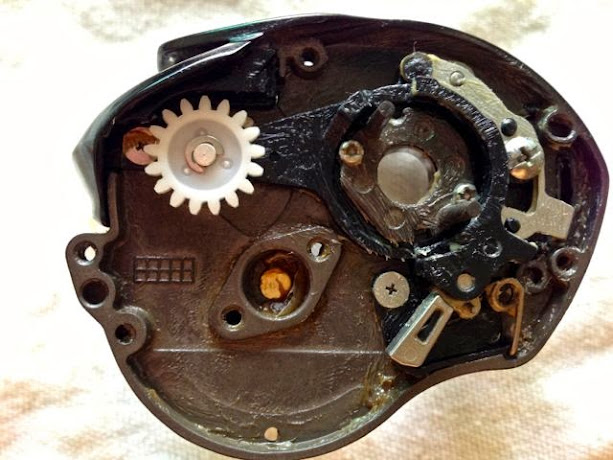
Secure with Retainer C #69.


Grease and drop Washer D #70 into its housing with the black side facing you.
Drive Assembly

Fit Drive Shaft #76 with white plastic Drive Shaft Gear #75, making sure the flanges are seated flat against the gear.

Grease Plate B #73 and insert below Drive Shaft Gear #75.


Refill the grease in Ball Bearing D #72, replace the shields and install. The size of this Ball Bearing is 9mm x 5mm x 3mm (OD x ID x thickness).


Secure with Retainer D #71.


Insert Drive Shaft Assembly into Frame #25.

Secure with two Screws F #74.


Lightly paint Cal’s Grease on Clutch Wheel #77 and install. Note that the ratchet teeth should point towards Clutch Trip Lever #40. (If you are installing a RH crank model, the image should be inverted).


Depress Clutch Lever #28 to test that the mechanism work well.


Install Drive Shaft Washer A #78.

Carefully grease the teeth of Drive Gear #79 and install. Lightly paint Cal’s grease within the gear too.


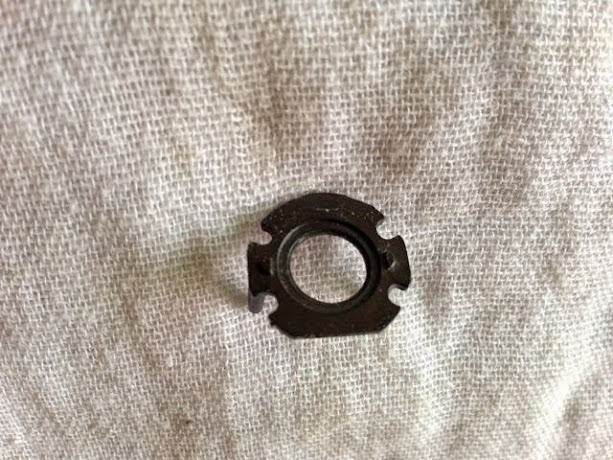
Carefully grease Pinion Gear #48 with Cal’s Grease, taking care not to get grease into the hole of the Pinion Gear #48, and hang by the neck to Yoke #46. Slide Yoke #46 down the two posts of Clutch Cam Plate #44.


Drop a Yoke Spring #47 down each post of Clutch Cam Plate #44.


Install Drive Shaft Washer B #80.


Lightly grease and install the thick Key Washer #81. Because it is thicker, It will not flex as much as thinner plates, resulting in stronger, more consistent drag pressure.


Oil Gear Shaft Collar #82 with CorrosionX (Do Not Grease) and install with its keyed ends fitting the grooves in Key Washer #81.

Finishing Up

Carefully paint Quicksilver 2-4-C Marine grease into every slot and corner of Left Side Plate #51, Taking care to reinsert Roller Clutch #83 in the correct direction. Give Roller Clutch #83 four drops of CorrosionX oil and work it into all the needle bearings. Do not use grease for Roller Clutch #83.

Lubricate Ball Bearing C #50 with a light oil. Install and secure with Bearing Retainer B #49. The size of this Ball Bearing is 8mm x 3mm x 4mm (OD x ID x thickness).


Attach Left Side Plate #51 to Frame #25, Secure with three Left Side Plate Screws #56 and #57. Do not tighten yet.
Lubricate Ball Bearing E #84 with CorrosionX and install. The size of this Ball Bearing is 12mm x 8mm x 3.5mm (OD x ID x thickness) and is the same size as Pinion support Bearing #36.
Ensure all parts align well before tightening the three Left Side Plate Screws #56 and #57.


Oil the threads on Cast Control Cap #55 with CorrosionX oil and install loosely.


Drop in Washer E #85.


Grease Click Leaf Spring #87, seat in Click Leaf Spring Holder #86 and install with flat side facing down.


Grease and install Drag Spring Washers #88 with concave sides facing each other.


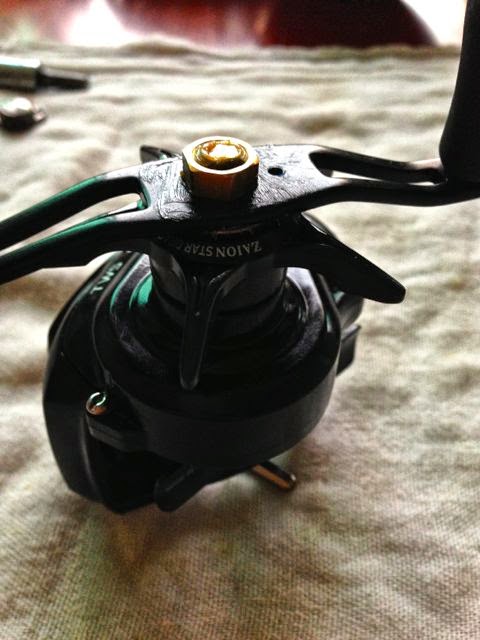
Grease threads on Drive Shaft #76 and carefully screw in Star Drag #90.


Install Handle Collar #91 with concave side facing down. Tighten Star Drag #90 firmly.

Grease and install Handle Assembly #92 and secure with Handle Nut #93. When you tighten Handle Nut #93, ensure that either the point of the hexagon or the flat side of the nut is aligned with a hole on Handle #92.


Cover with #94 Handle Cap and secure with #95 Handle Screw.

Clean Spool Ball Bearing A #14 and lubricate with one drop of light oil. Install. The size of this Ball Bearing is 10mm x 3mm x 4mm (OD x ID x thickness).


Secure with Bearing Retainer A #15.
Before you fit in the spool, clean away all excess grease that had oozed out through ventilation holes in the Frame#25. Failure to do so may adversely affect casting distance or light weights.
That’s all! The reel is protected from early corrosion and will be easy to service on subsequent use.
HTH,
LL
I hope this step-by-step guide helped you in servicing your own reel too. If you found this useful, please click the blue LIKE and FOLLOW buttons. If you would like me to help you service your reel, or if you would like to help me with the cost of keeping this blog running, please drop me a message via WhatsApp at +65-9431-0400. Thank You!
Text and Images © Lawrence Lee
All Rights Reserved
If you want to use any content for your own publication, please write me @ LawrenceLee_TC@yahoo.com

there is a reason why manufacturers do not coat the inner parts of the BC. grease will trap dried salt crystals. you’re basically killing your reel if you service it like this. once you start taking it out for SW trips you will start to build up salt crystals inside your reel. there is a purpose the reel is designed with drainage holes under the reel in the event salt water enters the unit, it will flow back out without getting in contact with other components. for BC reels you only need very little grease for the gears.
this information was shared to me by shimano’s official repair staff.
Thanks for commenting. You are correct, drainage holes in a reel must not be covered, and for reels that encounter sand, you should use minimal grease, as grease becomes a sand magnet that will then grind your gears down quickly. However, let me open your mind to the other aspect about greasing.
Normal greases are poorly equipped to prevent corrosion from happening when salt crystallises after exposure to salt water. There are however, some greases that have dielectric characteristics. These greases will actually prevent galvanic corrosion. (galvanic corrosion occur when an electric current passed from metal to metal via an electrolyte, eg salt, and cause an inferior metal to give itself to a more noble metal, quite like electroplating). So a grease with dielectric properties can prevent the current from passing between the metal parts of a reel, thereby preventing corrosion.
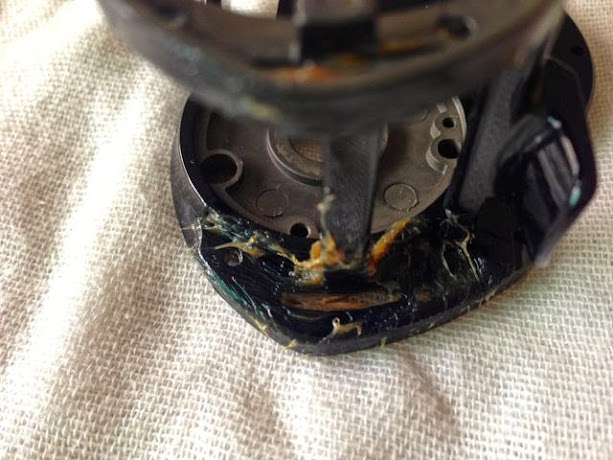
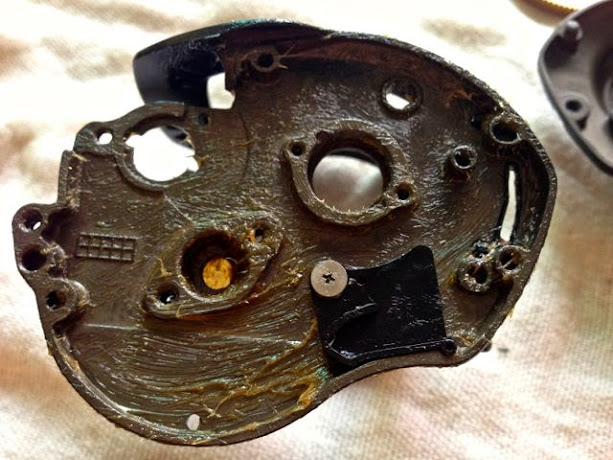
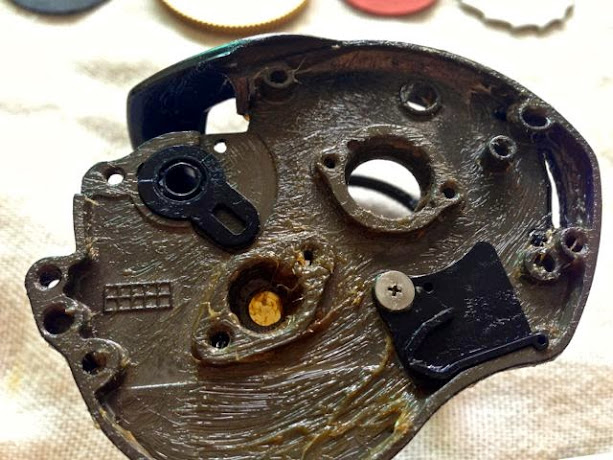
Marine greases fall in this category of dielectric greases. The most famous is the blue Yamaha Marine Grease. There’s also CorrosionX Grease, Cal’s Grease etc… but enough of theory here. Let’s see what happens to a reel that’s heavily coated with grease, used in saltwater every weekend, then rinsed with tap water, dried and kept… Here’s an old writeup I did in 2013 of a reel I got in 2008 and how thanks to the dielectric properties of marine grease, I have not one spot of corrosion on this reel, despite only fishing entirely in saltwater.
In conclusion, grease is good. No grease is also sometimes good. It is actually then the skill and experience of each reel servicing technician to determine what your reel is meant to be used for, the owner’s style of care and maintenance, and then prescribe the best form of lubrication for that reel to match the owner. Reel manufacturers cannot be that specific, and thus need to take the middle road, which is a compromise between longevity and finesse (bearing in mind that reel manufacturers will always hope that you find displeasure with your present reel the moment the next new model comes out, so that they can sell you the latest)
Dear Gaspinggurami!
I’m looking for clutch lever (#28) for my reel! My was broken. Could You help me? Where i can buy it? Thank You!
Pingback: ingenieurs marocains·
sir can you do tutorial how to change the TWS thanks
thanks sir , my tatula problem already solved i just wiggle it(left right up and down) to remove the drive shaft.glad you helped me out.
Glad it is out. What is TWS?
TWS(t-wing system) can you do a tutorial how to remove it, cause i need to replacing the TWS with a better one.thanks
My step by step guide here did include the steps doesn’t it? Part #61 is the TWS you are referring to?
some pictures did not show sir
Thank you very much Mr Lawrence… It’s great help sir… Love your thread…
Salute!!
Glad it helped 😊
Hello,i haved mannaged to broke the t-lewel wind from my tatula type r and now i need to change it
But there is another problem
Now when i press the button,the lewel wind guard its not working anymore…its not turning up&down
Have you guys know somebady who haved this problem before? With the t-lewel wind? To broke?
I didnt open it…im not that handy to disassemble the reel and put it back together 🙂
I haved purchased the t- lewel wind from USA,because in Europe or in my country,Romania i didnt find it…
Thanks for asking, Claudiu, I’m sorry to hear about your problem.
Check #28 and #65 is connected and not broken. They are plastic and can wear out or break.
I hope that will help you.
Best,
LL
my drive shaft stuck (already unscrews it) any idea to take it off thanks
When you turn the drive shaft #76 is it rough?
smooth as usual but a weird squeking sound
Weird squeaking sound, when you turn the drive shaft? Or when you crank the handle? I’m asking as I wanna eliminate all causes.
i think the culprit is plate #72 and bearing #73 stuck in the housing. any idea? thanks
Have you removed both screws that secures the plate down to the frame? It’s hidden beneath the white plastic gear. Turn drive shaft around till you see the screws. Remove both.
If still stuck, remove the other white plastic idler gear on the levelwind. Then with drive shaft not connected to anything, rock the shaft carefully from side to side to loosen the rusty ball bearing. That should free the ball bearing.
To help further, get WD-40 and spray down the shaft to help ball bearing break free from rust. Try to do that again after an overnight soaking in WD-40. The trick is not to hurry or you will break things. But either way, you have to buy spare parts since the ball bearing is a goner from the way it sounds.
Wash away all rust and WD-40 before you assemble.
Good luck and do update how things went for you.
yup i already removed both screws , i will try with wd40 1st,cause i dont know hot to remove the white plastic idler #75, thanks i will update.ohh that squeking sound when i crank the handle.
If you get squeaking when you crank handle, you should check the handle knobs are free turning and not squeaking to eliminate that cause too.
But since it’s jammed even though the two screws are removed, it’s highly likely due to a jammed ball bearing that’s rusted in the frame.
i already spray wd40 and rock the drive shaft and even i get so mad i pull it hard, it seem not coming out, i turn the drive shaft it feels smooth(not so smooth but it feels ok) not rough at all.
Seem like it’s truly Jammed.
You can fashion a puller as follows:
1) Get a bunch of big nuts/tube/Box wrench that will fit over the shaft and white gear.
2) Get a washer that will fit the nuts/tube/Box wrench
3) Slide in as many nuts/tube/box wrench as needed till it comes to halfway up the threads on the shaft.
4) slide down the washer to the nuts/tube/box wrench
5) screw on the gold handle nut #93 and tighten till shaft comes loose.
Hope that helps
Hi , for the part #89 washer(F) .is there a direction i need to follow ? the black surface of it facing the handle ?
thanks
The black side of #89 washer (F) should be facing upwards, in contact with the star drag #90. The metallic side in contact with Drag Spring Washers #88.
Hello I have a question that I would like to ask… Can you use these reels in salt water? I just got mine but someone told me not to use it on salt water
As long as you follow what I did in this step by step guide, and you remove all the line and wash the reel in fresh water preferably with SaltX after each use, and you re lube the reel regularly, I don’t see why your reel cannot be used in salt water as I use mine at saltwater estuaries and it’s still serving me well today.
can i apply with my tatula HD? i want to open and service my tatula HD but scare.
I’ve not have a chance to take apart the HD nor looked at the schematic. But seeing how the parts bin are shared, I’d hazard a guess that this is pretty much the same looking components as the Type R, only beefier.
Good luck on servicing it and do write back to let us know how it went
Great reel, great instructions. I have a brand new Type-R in a box and I will do my best to follow your instructions.. Thank you for sharing!
Glad you are able to use my tutorial.
Hope your reel give you many years of good service.
This is great work! I salute you, bro.
muchas gracias amigo,me ayudo mucho en el excelente funcionamiento
de mi daiwa tatula type r,saludos a la distancia.
Great work !
You are the man. Nicely done! I hope someone pays you well to publish this.
Thank you! I do this to share with anglers, what I have serviced. I’m not paid anything except for compliments by people like you, who appreciate my work.