
[Edit: 17 Nov 2015. I’ve added more details as parts wear and get replaced. I’ve also edited some details. The edits are marked in brackets such as this.]
The Shimano Calcutta Conquest had not changed much of its design and engineering since its early days. It’s the embodiment of Antoine De Saint Exupery’s quote in his book Wind Sand and Stars “…perfection is finally attained not when there is no longer anything to add, but when there is no longer anything to take away…” Thus so the Conquest had unchangingly endured until this 2014 model.
Now with X-Ship bearing support for its pinion gear, Micro Module Gear for its drive train, SVS infiniti braking, S3D spool manufacturing and a new S Compact body. These were proven technologies in 2013 on various other Shimano models but finally they are presented all together in this one reel!
My first impression of this reel is that it looks very small for a 200-sized round baitcaster. It also lacks heft that the old Conquest exudes – a quiet defiance that screams I’m a tank, and so I weigh like a tank, the former model instils confidence like the old pre 1990s body armour would. This latter model is like the “new” Kevlar flack vest – light. It shook me a bit, to think the new Conquest is gonna be a less capable reel after a diet and a tech update and owners of the older Conquest will surely notice this difference. Furthermore, not all weight reduction is good – rods that were perfectly balanced with the earlier CQ200 have become a mite tip heavy when mated with this latest incarnation so a butt cap counter-balancer becomes a great idea if you had one fitted when you built that rod to mate with an earlier CQ200.
But let’s move along and unpack this reel to find out more…
External views of this reel
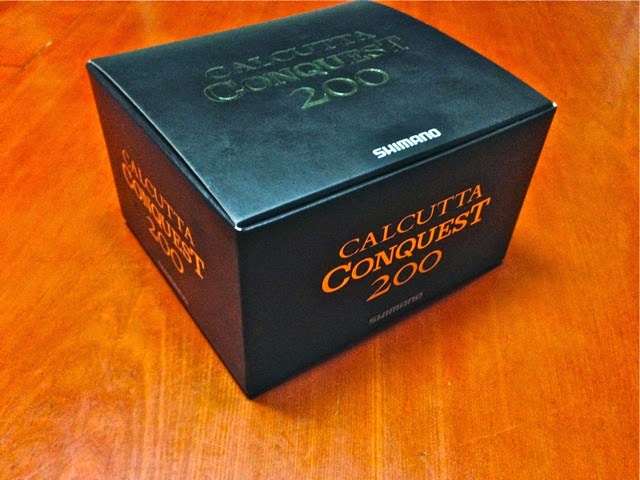
The new packaging is discretely done in matt back with gold hotstamped lettering.
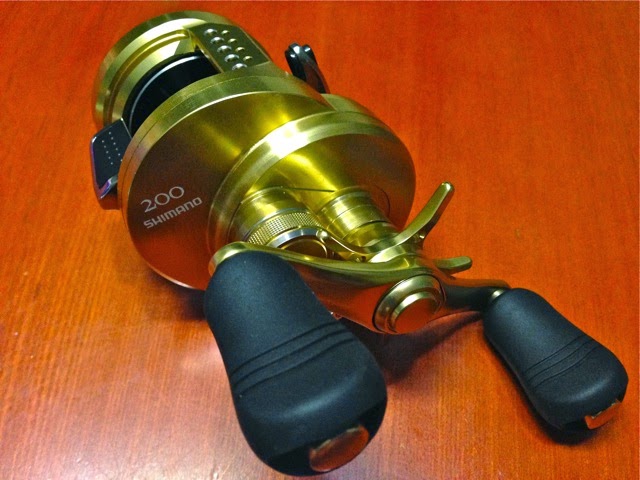
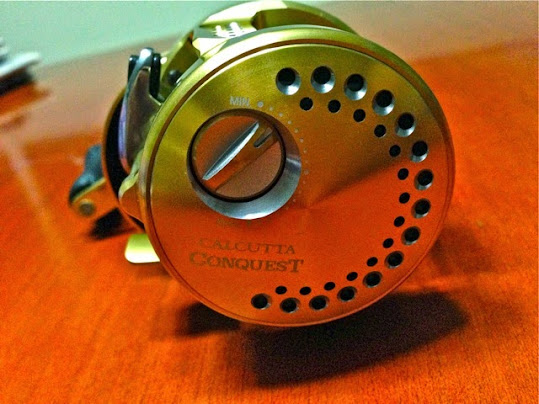
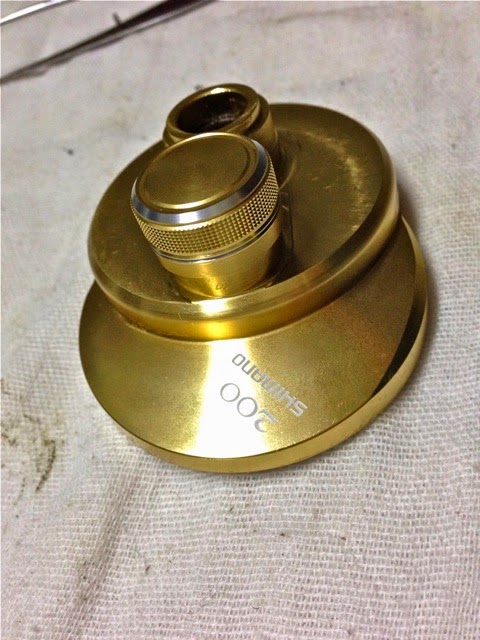
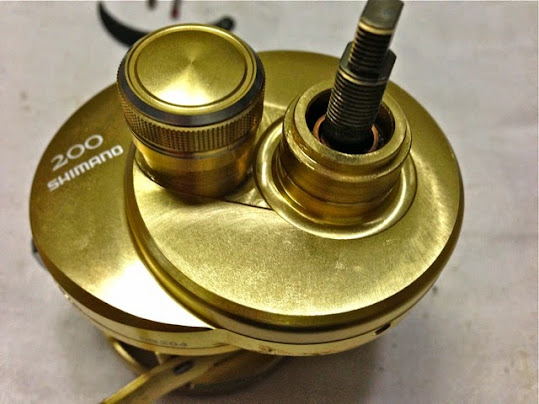
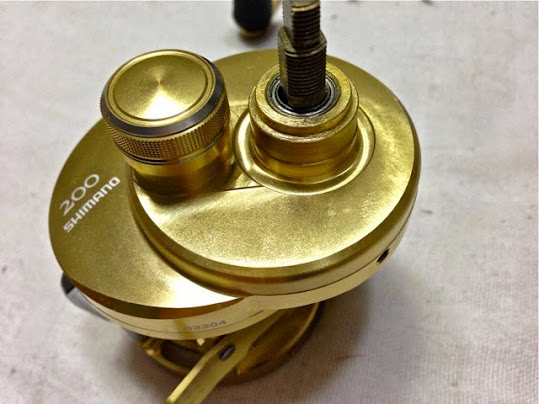
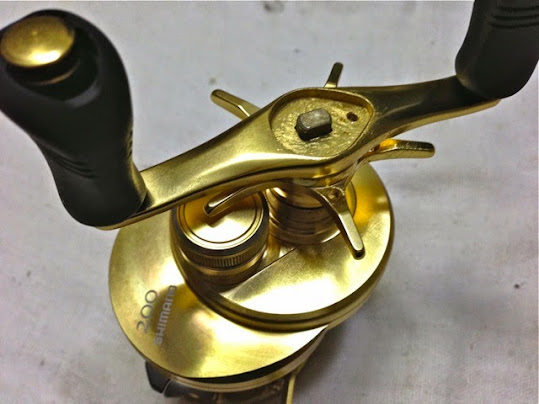
This reel is really tiny, other than the full sized handle. The Cast control knob however is huge. It makes for better fine adjustment than a smaller knob. However, it looks like its design is isolated from the rest of the reel. It doesn’t reflect any design element on the reel except for a silver bevel.
The flat thumb rest lacks a third row of ported holes that older Conquest models bear. But the asymetrical, minimalist look was the design element that first drew me to give this reel. I did a second look, which eventually led to the purchase. Gone too is the gold anodised spool with its drilled holes, although once spooled with line, this will not be noticed much.
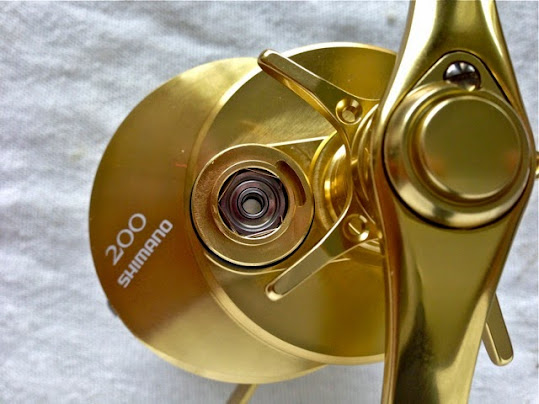
Right out of the box, freespool was a dismal 5 seconds with all brakes off and the spool tension knob set just to eliminate endplay. When I took the spool out to inspect, I found the spindle dripping wet with oil. Cleaning off this excess brought freespool time closer to 20 seconds on an empty spool. Very decent for an out of box reel.
It has a cast control knob! Horrors I don’t want DC in my reel! But phew! it’s not DC control, it’s actually fine adjustment for the centrifugal braking system Shimano calls SVS infiniti first seen on the Antares.
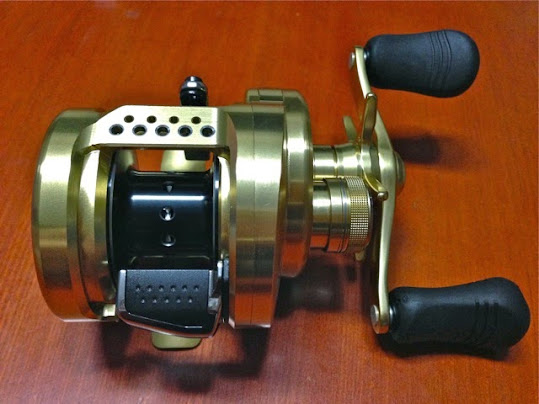
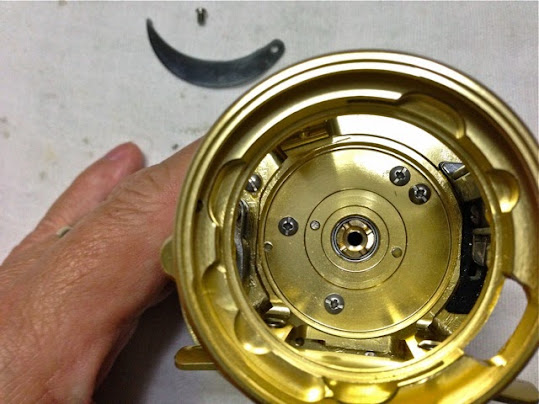
The palming sideplate still retains the familiar concentric rows of ported holes which had attracted many to the original conquest. This model sports a deep countersunk look which is not gold tinted. The SVS port also reflect the same design. However a third row of very fine holes on previous Conquests were abandoned on this which leaves a feeling that there is less effort paid to fine machining on this reel than its predecessor.
Ported holes on the star drag has their countersunk holes gold anodised over. It just reinforces to me the feeling that this reel was put together without as much attention to details as its older ilk.
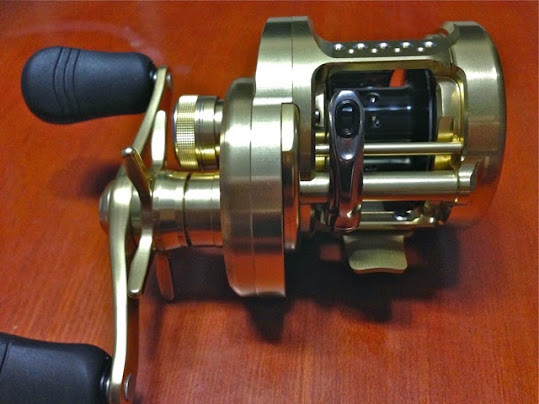
Because the palming sideplate has been reduced in size, the Level Wind Guard needs to be numerically carved out of the block to extend outwards. Both Level Wind Guard and Level Wind Guide have gold tint anodising instead of chrome. Together with black anodised spool, it makes for a muted, sombre look. Let’s hope the anodising will last as a moving levelwind will surely wear the colour out in short order especially if fishing at muddy or dirty water.
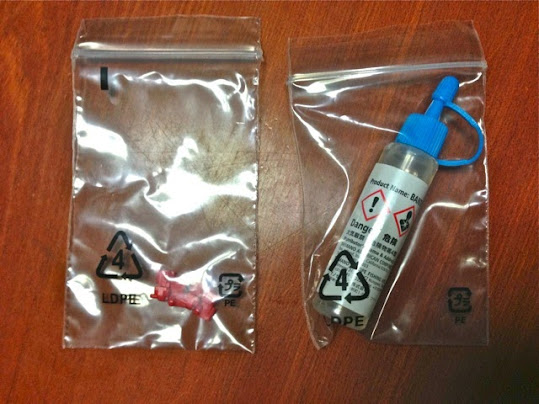
Spare brake pellets and a bottlet of Bantam reel oil comes with this model. No wrench was supplied, neither was any bottle to hold the pellets unlike the old days when even the lowly Calcutta provided a plastic bottle to hold the spare pellets and wrench.

Instead of a leatherette reel cover, Shimano supplied a microfibre pouch that can pack the complete reel, but only when it is disassembled from the rod.
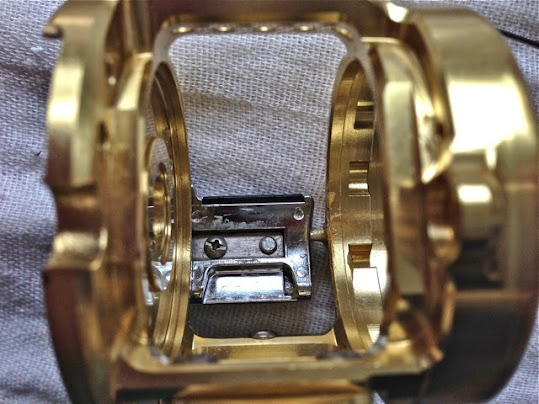
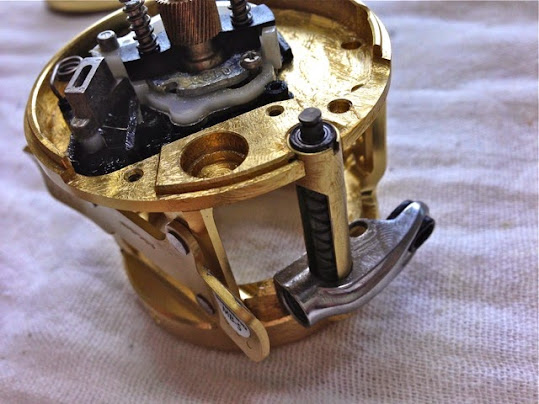
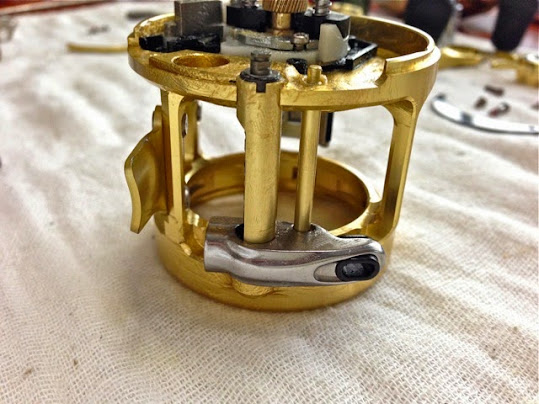
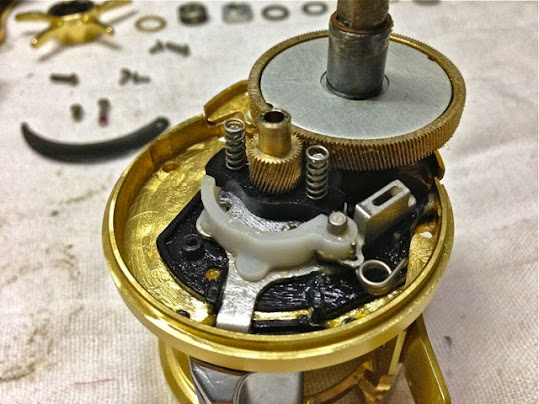
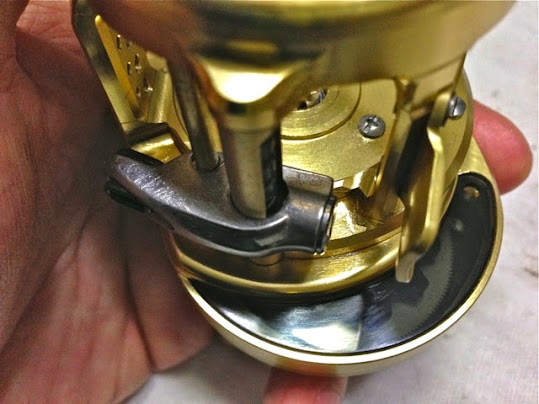
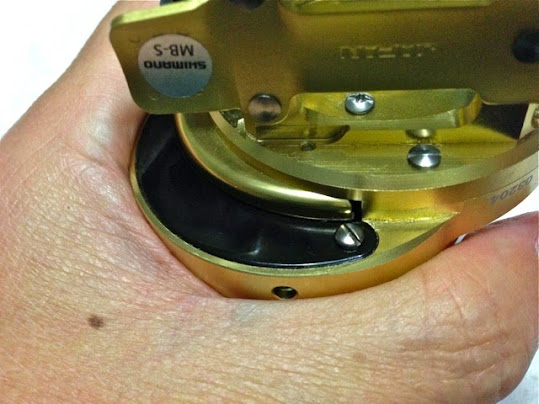
A discreet “escape hatch” lever is tucked behind the palming side plate, activating a spring-loaded sideplate to flick open for changes to be done to the number of centrifugal pellets. Sliding another catch allow the spool to be removed. This slides smoothly and fits with close tolerances, attesting to the precision plastic moulding put into this reel.
However, shutting of the sideplate hatch gives a very unrefined and crude action that mars the pleasant feeling from fitting the spool back.
The reel cranks so smoothly at this stage that I’m at a loss of words to describe the sensation. “Buttery smooth” seem an absolutely insufficient term to even start to describe its smoothness. There was no freeplay, no clicking sound, not even the sense of friction anywhere when cranking this reel. I’m impressed that Shimano had managed to take the already smooth cranking Antares HG micro gear another step further in this reel!
[Edit 17 Nov 2015. After a year’s use as a crankbait reel, fighting large cobia, shark and grouper, the micro gears on this reel appear to be holding up well – It cranks smoothly like all my reels despite the tiny teeth. However, with the launch of the HG model this year, my need for speed got the better of me and I swapped out the drive and pinion gears for the HG set. The newer gears have coarser pitch teeth. When I reassembled the reel with this new drive set, I’m amazed how buttery smooth it felt.
On hindsight, I realise that the micro pitch gear had gotten worn and as it wears, it got rougher. But it was no rougher than all my other reels, so I never noticed the degradation until this new drive set was dropped in.]
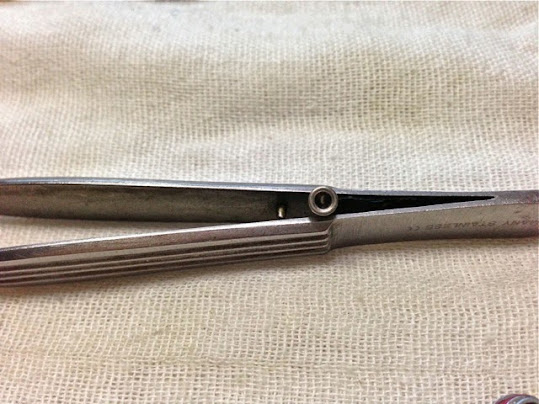
Some tools and kit I used in doing this reel
Before you embark on stripping the reel, check that you have the necessary tools to do the job. I know I’ve said it before and I’m gonna sound like a broken record but I’m gonna say it again. It can be really frustrating to be halfway through stripping a reel only to find that you are in want of a tool to complete the job. You then go out to buy the tool and come home to find the dog had scattered your reel parts to the four corners of the room and some part is lost… Now it’s hard to stay angry with the dog so instead of blaming yourself, be prepared. Get your tools and kit in order before embarking.
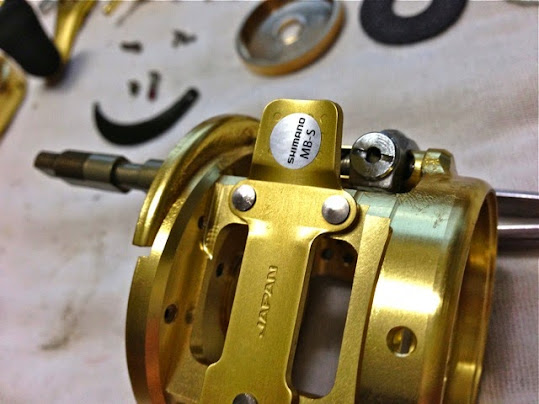
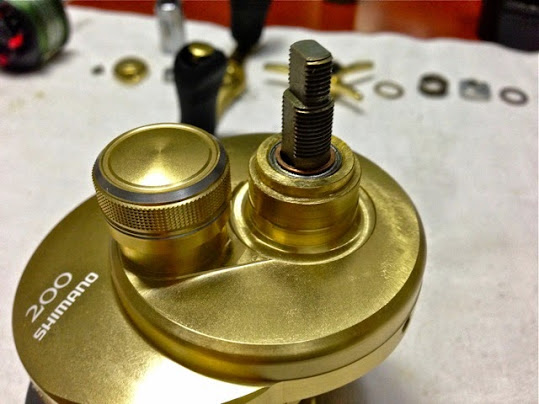
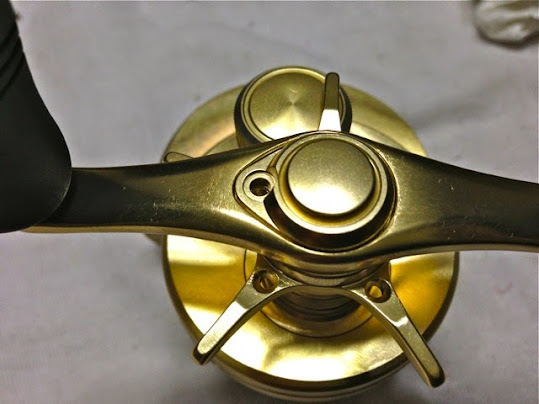
Sleek! No screws to be seen anywhere!
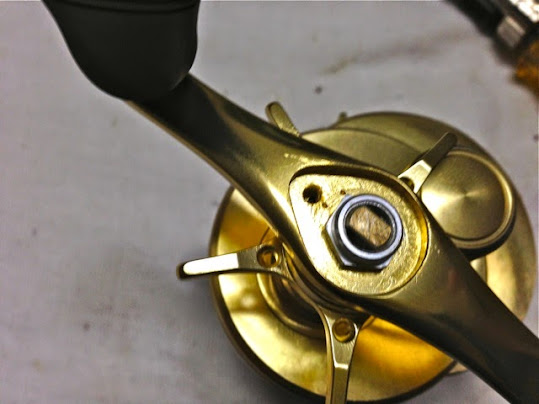
Shimano had done well to eliminate any visible signs of screws from the outside of this reel, save one securing the Handle Locking Cap, the plastic viewing window, and one holding the right sideplate. With that, it also means you got to have precise, fine tools to do the job right or risk scratching your frame. The main screws tucked inside of each sideplate are size 3.5 slot screws. But to access that, you need a long straight shaft screwdriver. A small Size 0 Philips head screwdriver is also needed and a size 11mm box wrench to remove the handle nut.
You also need your tweezers, greases, oils, towels and degreasers.
Now that your tool kit is in order, let’s crack it open to take a look at the insides.
Always have the reel’s schematics with you when you strip down a reel
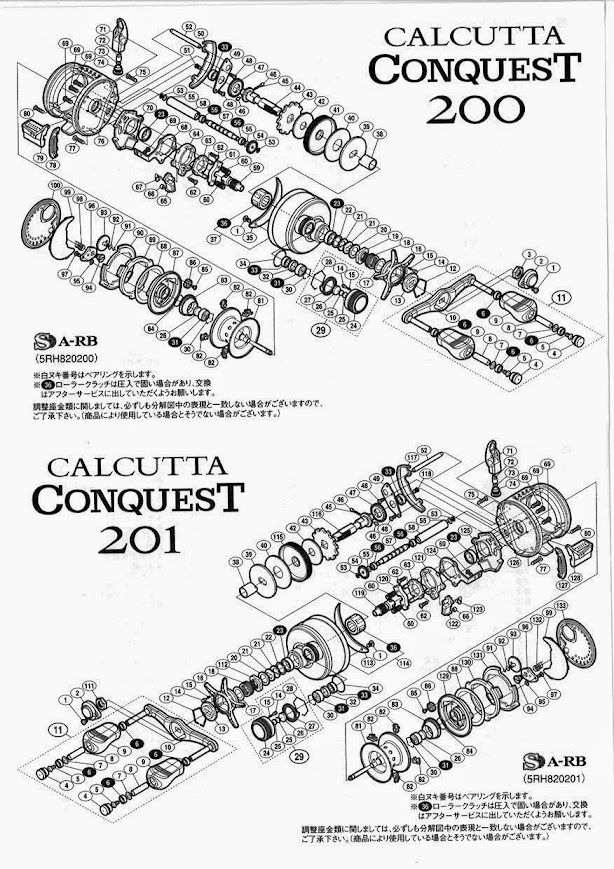
It may seem silly to have one beside you when your fingers are oily and greasy, but often, it’s because I have the schematic with me that I could figure how to strip or reassemble the reel. Since the CQ201 and CQ200 are laterally inverted versions of the same reel, this step-by-step will apply to you too. But do note that the lefty models tend to have counter-rotating screws etc, so don’t force if you find that some screw etc doesn’t want to come out! If you are afraid of soiling your original schematic, make an enlargement of it on A3 size paper just for servicing use.
In this step-by-step, I’ll be using my own terms to name the parts in English. But I’ll also include the Schematic #number with my part name, so you can refer to what I’m describing with certainty.
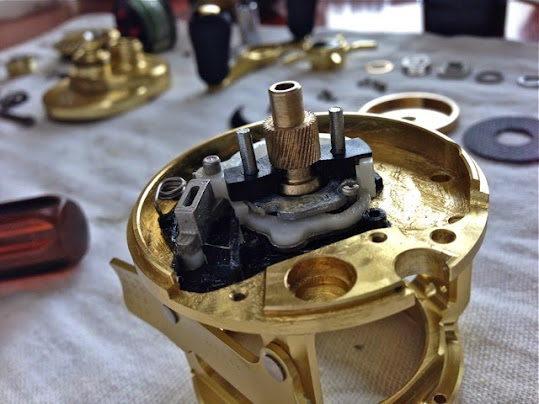
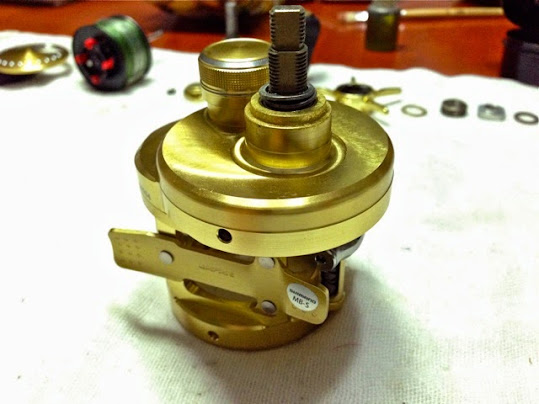
Plastic Sideplates?
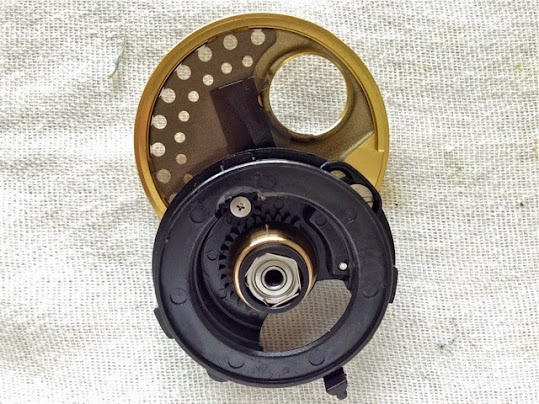
Although it fits with precise tolerance, I was surprised that the sideplate #87, #88, #89 and #90 for Conquest 2014 was made of moulded plastics! How can it hold up to heavy cranking? How much torque will be wasted to plastic flex? These were thoughts of regret that crept through my head when I saw this, but was quickly dismissed when I spooled in line – I’m blown away by the way the reel cranked in line under load… I wound in a spool of 30lb Sufix 832 from a donor reel. When cranking in the line taut under a decent amount of drag pressure of the donor reel, I felt no need to put in any more effort to crank, than I would any solid framed reel. In fact, it was so smooth that often I imagined the drag on this CQ200 had slipped, only to realise that it had not, but rather the reel had so much torque and was so creamy smooth to make the task seem impossibly easy.

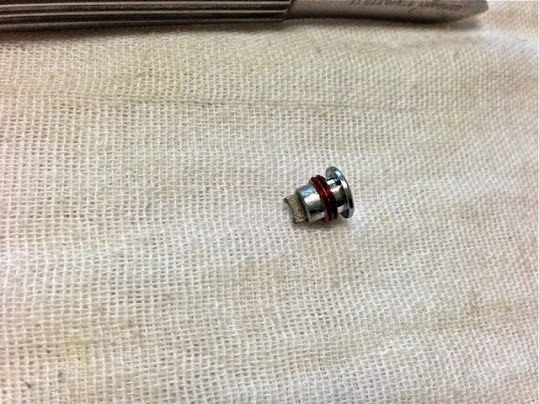
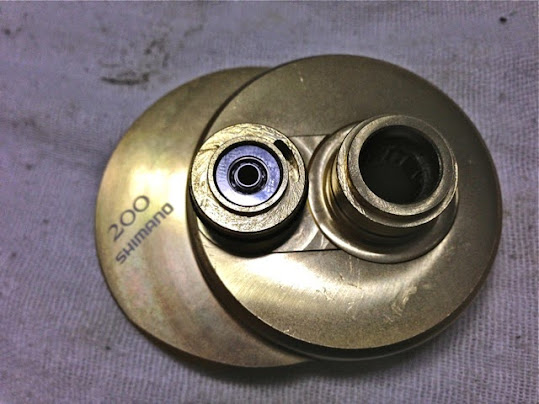
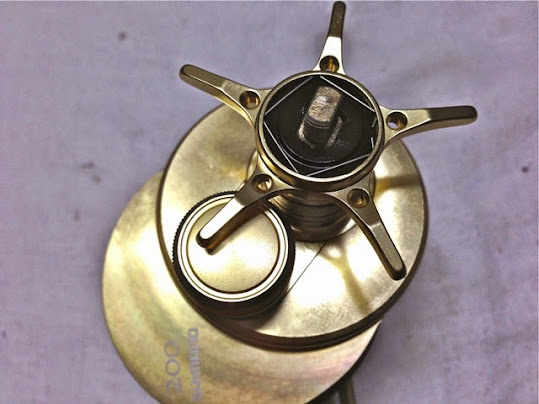
Inside of the spool tension cap #24 with ratcheting click adjustment. Nothing much to do here, except to add a drop of CorrosionX to the metal parts.
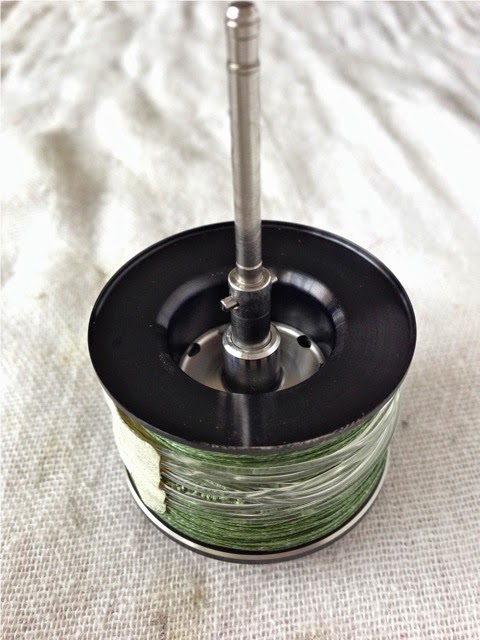
There’s no spool support bearing under the cross pin so all spool bearings can be removed for servicing without the need for a special spool pin remover.
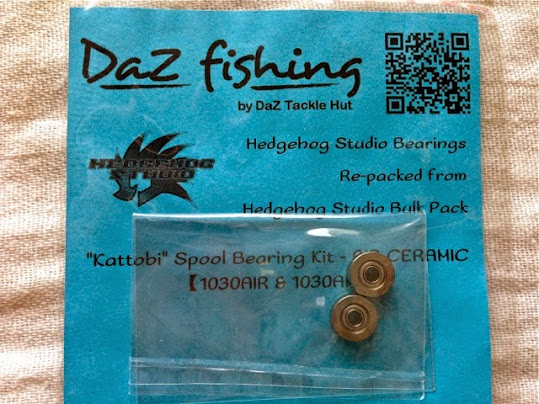
Hedgehog Studio’s Kattobi Air Ceramic Bearing Replacement
I got me a pair of Hedgehog Studio’s Air Ceramic bearings which are much higher specced than the already highly specced stock bearings. [Edit 17 Nov 2015. The packaging shown below for Hedgehog bearings are not what would come from Hedgehog Studio. They are repackaged bearings from Daz Fishing.]
I chose to replace the stock bearings even though they were very good because the ARB bearings had permanent shields which made it difficult to properly clean and service the bearings after use. These Hedgehog bearings are open and makes servicing them a breeze.
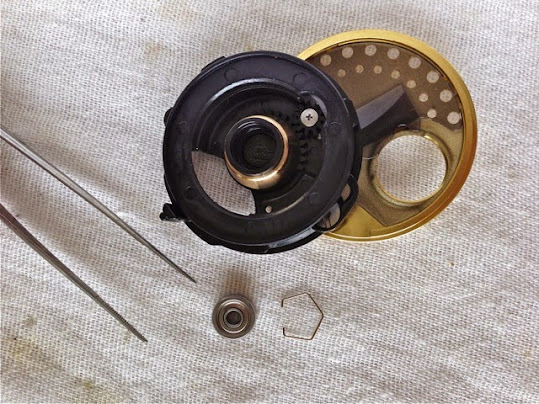
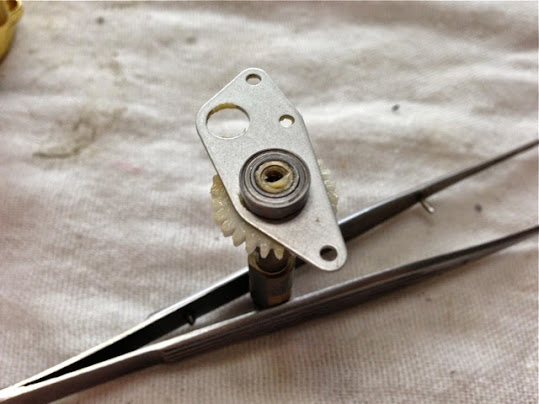
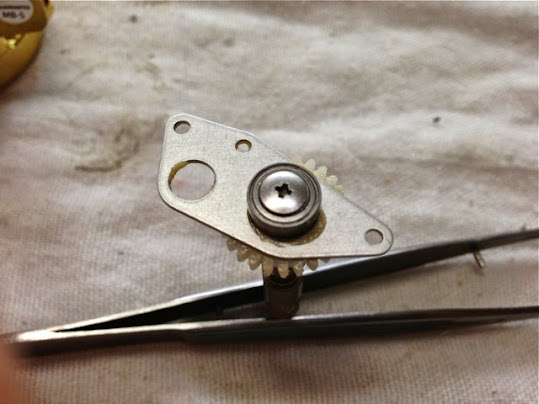
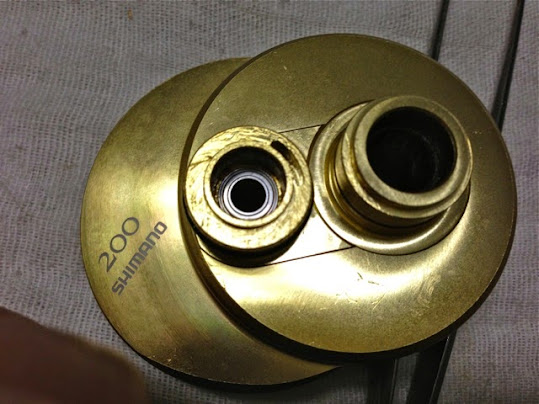
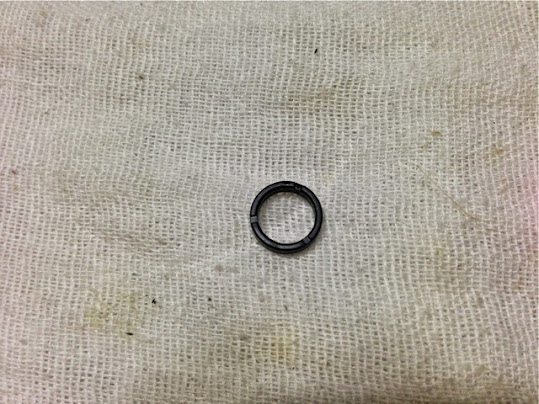
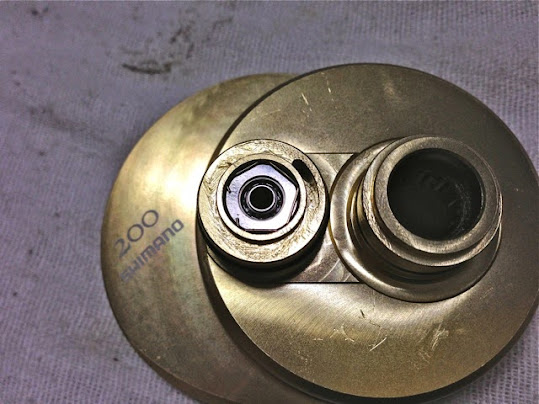
Left spool bearing #31 is held in place by a circlip #30. Remove the circlip #30 under a clear plastic bag to avoid losing the flying clip.

Right spool bearing #31, behind the Cast Control Knob #24, is also retained by a circlip #30. Beneath that is small pinion support X-ship bearing #33 which is separated from the spool bearing by a black plastic sleeve #32.
You can only remove the right spool bearing #31. You can’t pry out the Pinion Support X-ship bearing #33 unless you had removed the Pinion Gear #59.
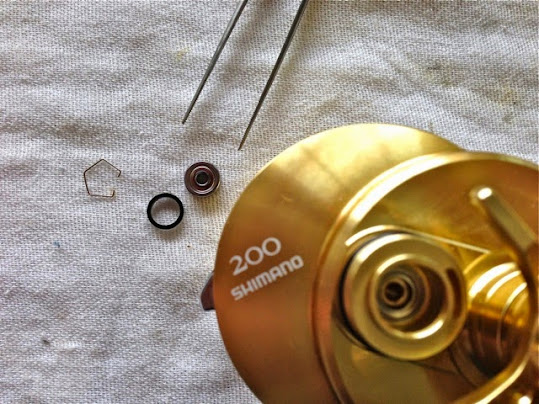
Shielded vs Open bearings
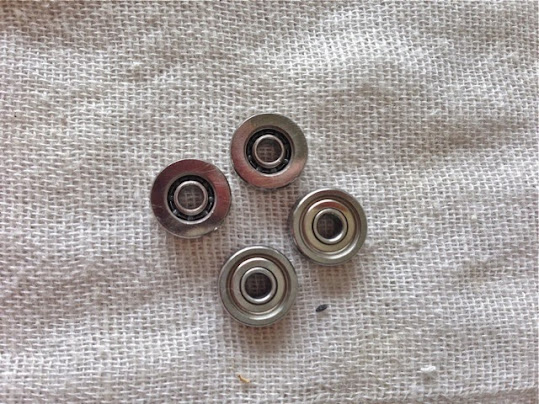
The top two are Hedgehog Studio Kattobi Air Ceramic bearings. The bottom two are Shimano’s stock ARB bearings. The open Hedgehog bearings are easy to clean out and that is important if you want a smooth spinning bearing.
[Edit: 17 Nov 2015. The Hedgehog Studio Kattobi Air Ceramic bearings have worn out. It’s probably running above its rated RPM as I had been casting 30g metal jigs with this reel. I’ve dropped back the stock bearings for now. When that too gets worn, I’ll be replacing them with the Hedgehog Kattobi ZR or ZHi bearings instead.
All other bearings are still smooth and serving well.]
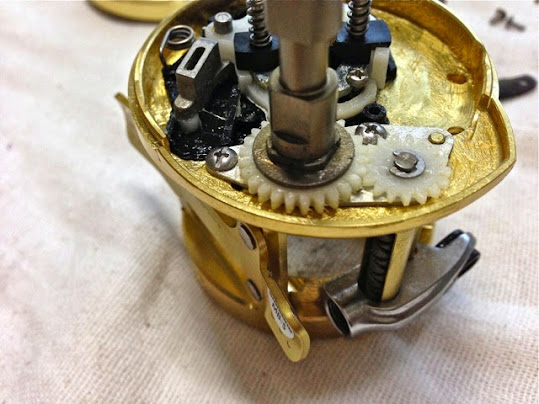
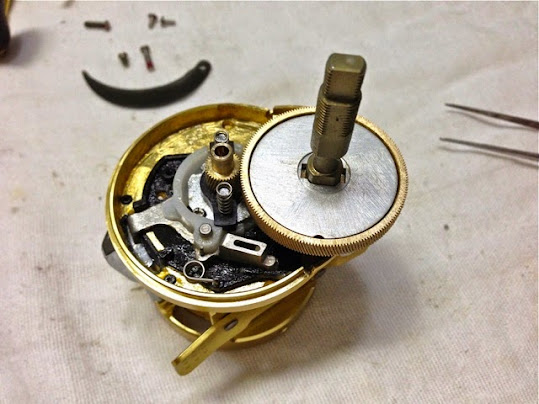
Take pictures as you strip the reel

Here I see that the belvielle springs #21 for the drag are opposed. Also, the dual sided washer #20 has its copper side facing the belevielle washer #21. Take a lot of pictures as you strip your reel so that you know how the parts fit together when you assemble them.
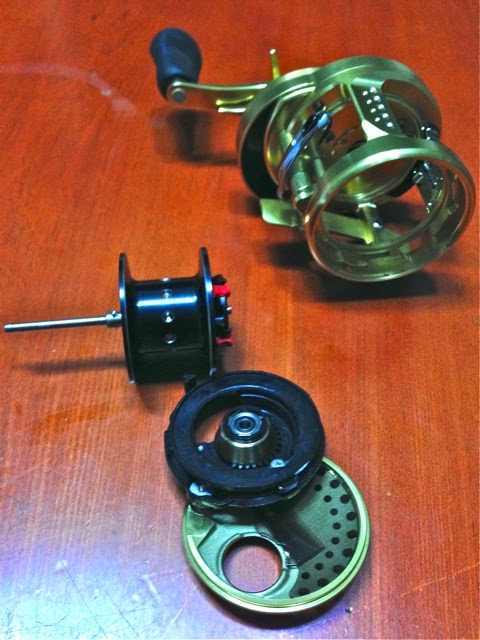
The disassembled reel
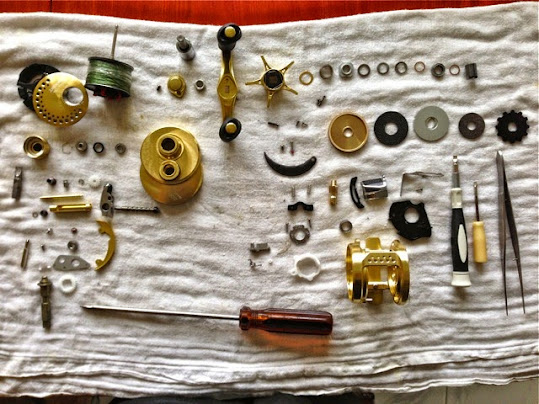
The beauty of a round baitcaster is its simplicity. Here’s all the parts that I need to strip out from this reel – it’s a fraction of the parts found in a low profile baitcaster and even lesser compared to a spinning reel.
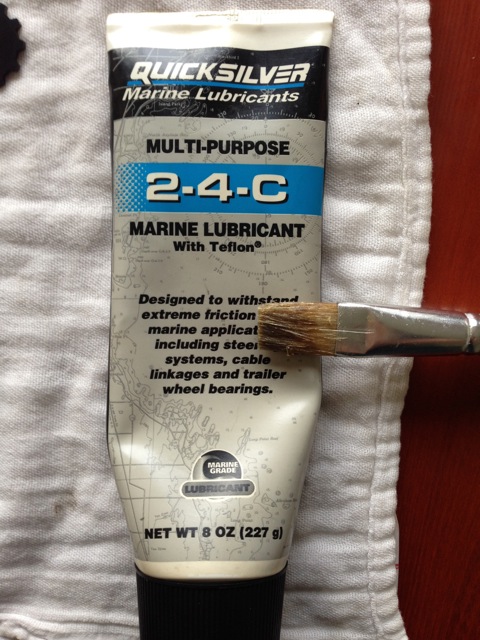
I’d like to say something here about marine grease. It is NOT the only lube I use, and I don’t use it for everything. I do not use this to lubricate my drag stack. I also do not allow it to get into my anti-reverse bearings and my spool bearings. In fact, I use it more as a coating over metal parts to protect from galvanic corrosion after saltwater use, and I use Cal’s Grease for my gears and drag. I use Quicksilver 2-4-C not because of any special preference, but because I have leftovers from servicing my Mercury outboards.
Putting it back
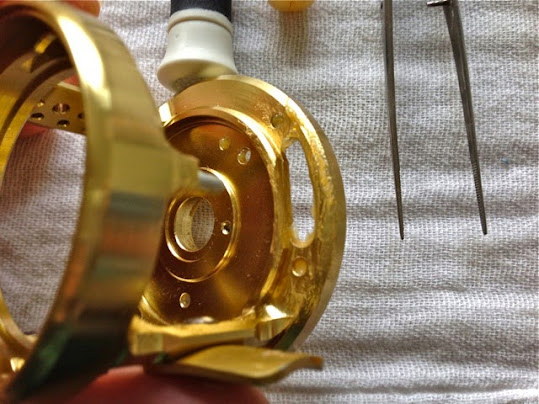
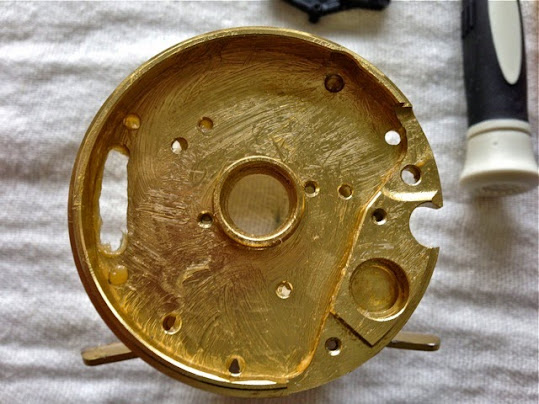
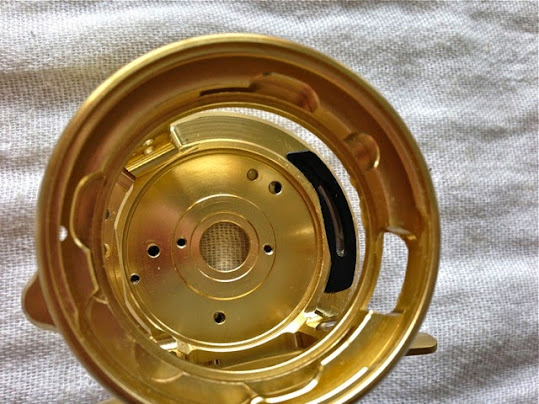
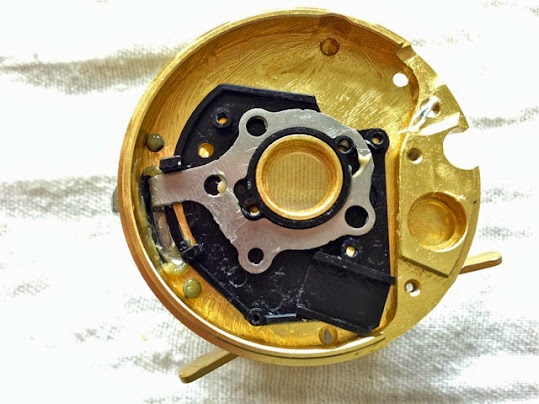
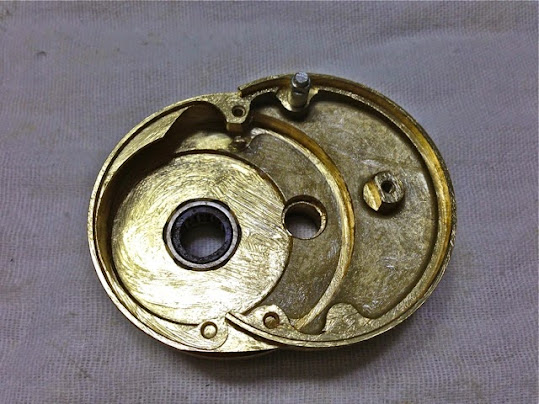
I start by giving all metal surfaces a coat of 2-4-C marine grease. I pay special attention to the areas that get waterlogged and out of reach after a rinse down, like this slot for the Quick-Fire II Clutch Bar.
Coat the insides too, taking care to get the screw holes coated with 2-4-C Marine Grease. A paintbrush will get the job done easier.
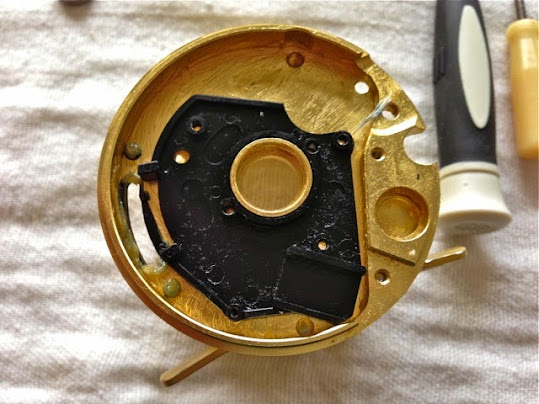
Snap on the black plastic pad #70.
And the clutch bar guide #78. Then attach the three self tapping screws #69 to hold the black plastic plate #70 to the frame.
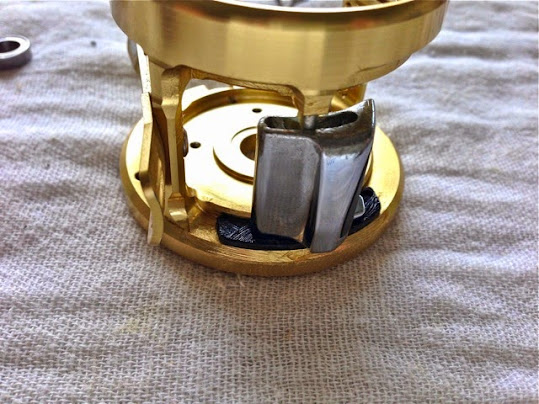
Slip on Quick-Fire II Clutch bar #79.
Grease and insert Clutch Cam lever #68 into Quick-Fire II Clutch bar #79.
Secure with self tapping screw #69. CAUTION: Parts are moulded plastic, do not overtorque.
Big Pinion support bearing #23 have shields that can’t be replaced. I’ll not bother with removing the shields now, but I dropped a drop of CorrosionX to lubricate the balls within. The dimensions are 12mm x 8mm x 3.5mm (OD x ID x thickness) [Edit 17 Nov 2015: My apologies, I typed 12mm x 8mm x 4.5mm in my original post. That was incorrect. I’ve amended the size. Many thanks Stephen Lew for highlighting this]. Eventually when this corrodes, I will replace with a greased bearing without shields, or a fully ceramic bearing which is corrosion proof.
Drop the long end of Clutch Pawl Spring #67 into hole in the black plastic pad #70.
There’s a tiny plastic roller #66 that’s attached to the Clutch Pawl #65.
Grease and attach to Clutch Pawl Spring #67.
Drop Clutch Cam #64 over the stud on Clutch Pawl #65. Do not attempt to fit Clutch Cam #64 into its seat at this stage.
Place Clutch Cam Retainer #63 over Clutch Cam #64. Note how the posts are oriented at an incline. Lightly thread in the two retaining screws #62. Now twist Clutch Cam #64 to load Clutch Pawl Spring #67 and to seat the cam into its seat. Then tighten the two screws #62.
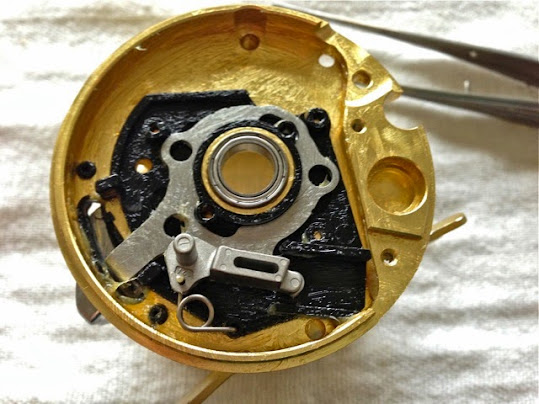
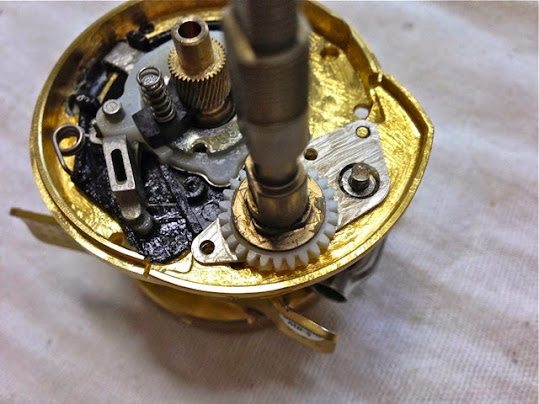
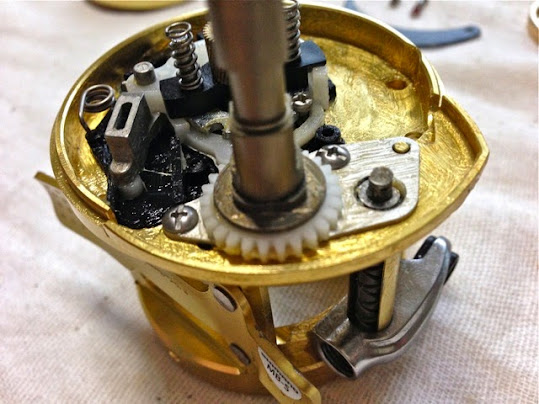
Drive Assembly
Grease Yoke #61 and Micro teeth of Pinion Gear #59. Take care not to get grease into the hole in the pinion #59 or your casting distance will reduced by a quantum. Mount Yoke #61 over two posts of Clutch Cam Retainer #63.

Insert two Yoke Springs #60.
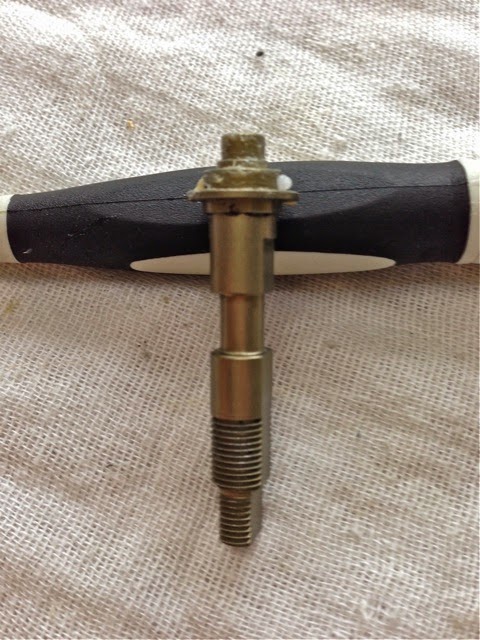
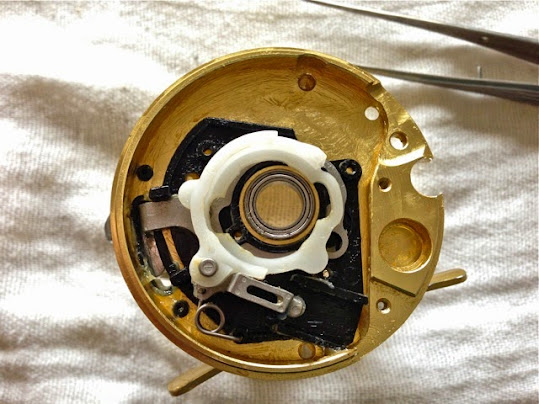
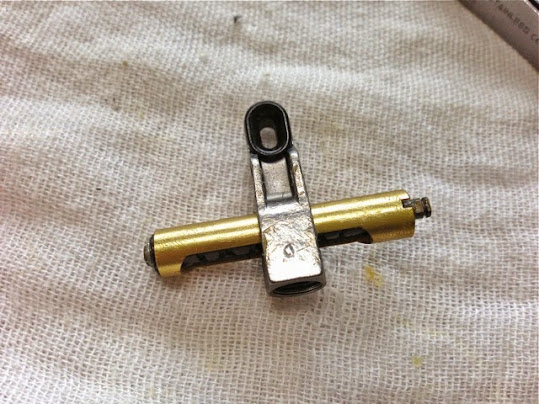
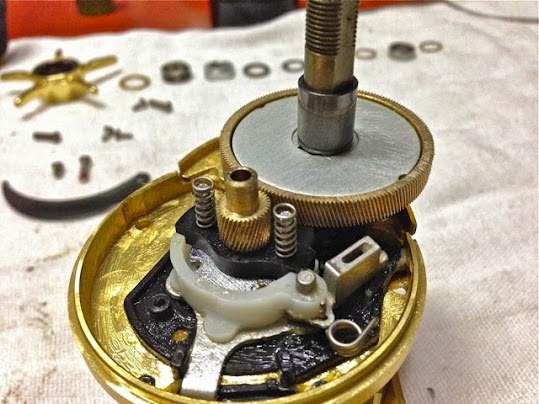
Drive Shaft #44 has a spring loaded #45 plastic pins #46 on the end. Generously grease to prevent them flying too far away if they should pop off during assembly.
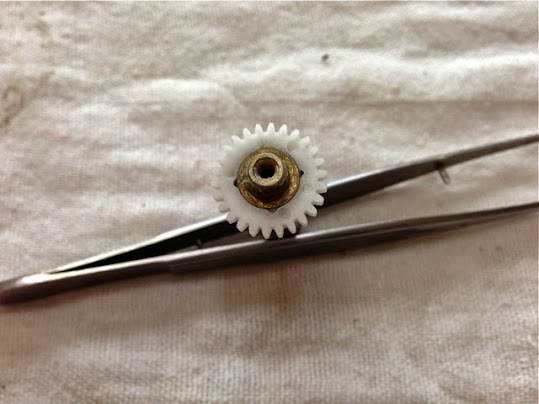
Seat in white plastic Idler Gear #47 to catch on these plastic pins #46.
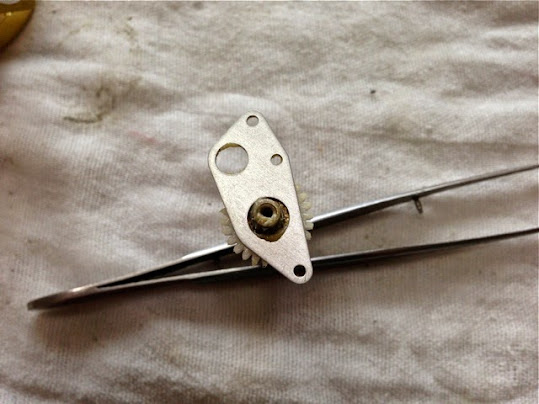
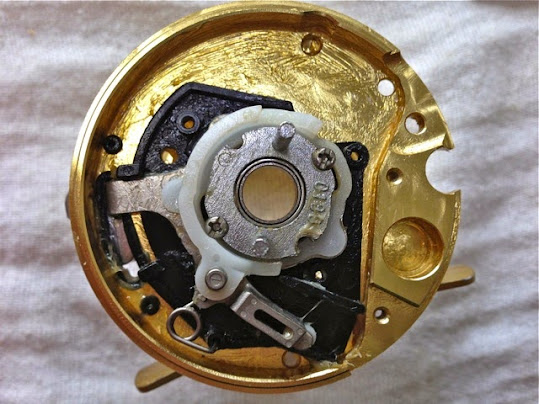
Grease and drop in Retainer Plate #49, take note the side facing out has rounded edges.
Oil with CorrosionX and drop in Small Drive Shaft Bearing #33. The dimensions are 9mm x 5mm x 3mm (OD x ID x thickness)
Secure with retaining screw #51 and place Drive Shaft Assembly aside.
Oil both Worm Gear Bearings #56 with CorrosionX and seat within Level Wind Guard #58. The bearing dimensions are 6mm x 3mm x 2.5mm (OD x ID x thickness).
Grease Worm Gear #57 and seat with bearings.
Slip on Line Guide #71.
Seat Level Wind Guard assembly #58 to frame #76.

Drop Washer #55 in.
Grease and install Level Wind Guide #52.

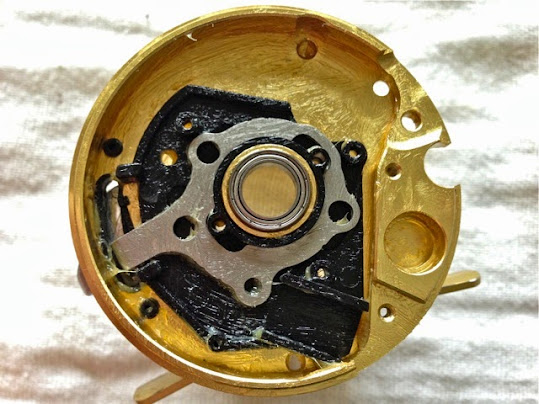
Grease and seat Gearbox Extension Plate #50.
Seat Drive Shaft #44 Assembly into its housing. Be patient as close tolerances make it slip in ONLY when all points are accurately juxtaposed.
Secure with two retaining screws #48.

Drop in plastic Small Idler Gear #54.
Secure with E Clip #53.
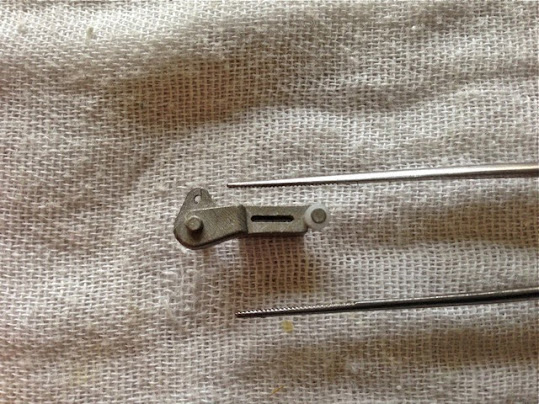
I’m surprised that even the Levelwind Pawl #72 is not spared the dieting regimen and is now hollow!
Drop Washer #73 into Pawl Cap #74. Then drop in Levelwind Pawl #72 with the crescent blade facing out.
Gently tighten Pawl Cap #74 while you give Drive Shaft #44 a turn. Do not fully tighten until Line Guide #71 starts to run in sync with the Drive Shaft’s #44 turning.
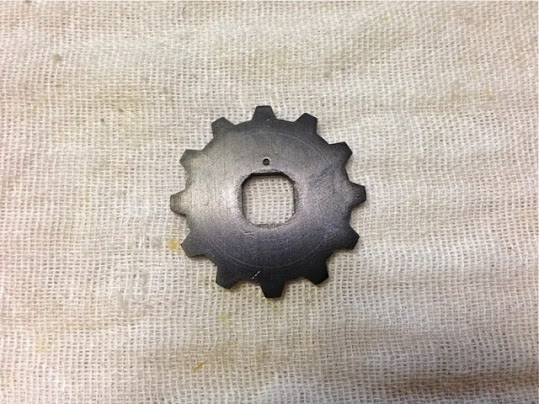
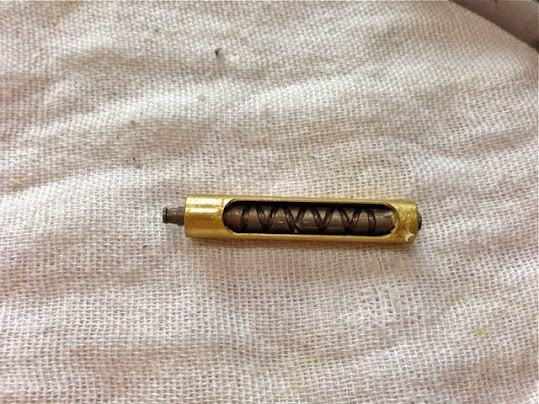
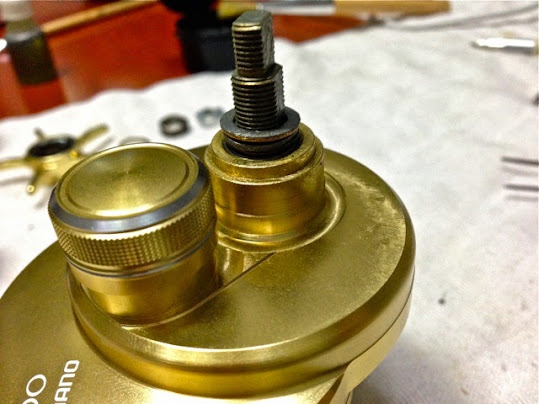
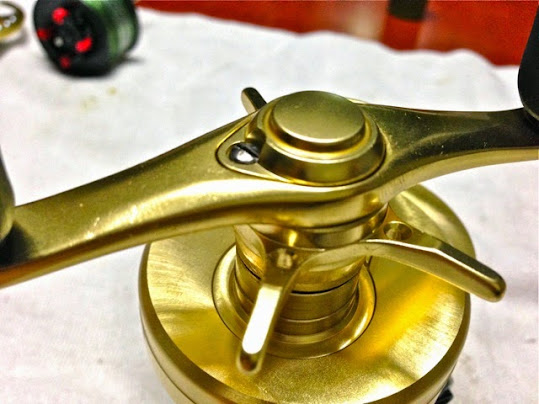
Spool Return Ratchet #43 has one side with a dot hammered in.
[Edit: 17 Nov 2015 After a year of hard use, this Spool Return Ratchet had pitted and worn. I will be replacing it with the part from the Ocea Conquest 200, which is a Stainless Steel part. The Part number on the Ocea Conquest schematic is #51]
Grease lightly with Cal’s Grease and install in Drive Shaft #44 with the dot facing out.
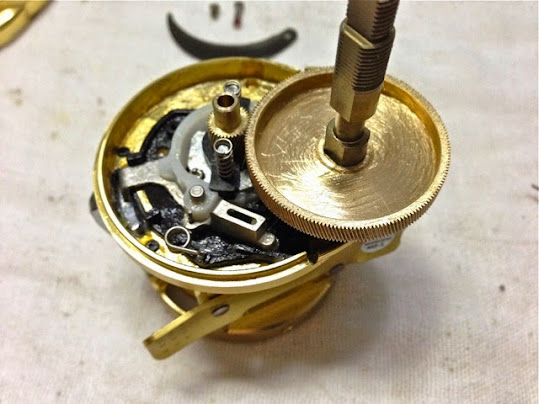
Clean and install Dartanium Drag Disc #42.
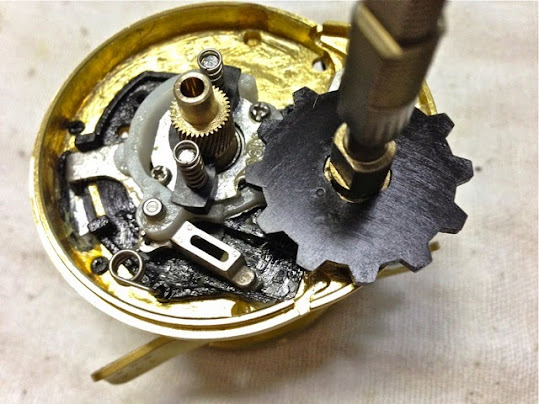
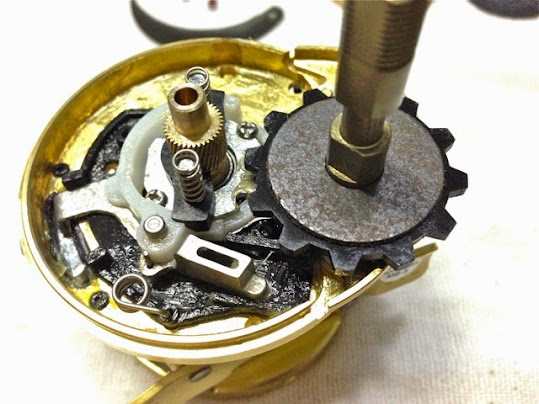
Lightly grease all sides of Main Drive Gear #41 with Cal’s Grease, taking care to get grease in between the Micro teeth and install.
Drop in X-Carbon Drag Disc #40, then lightly grease Drag Pressure Plate #39 with Cal’s Grease and install.
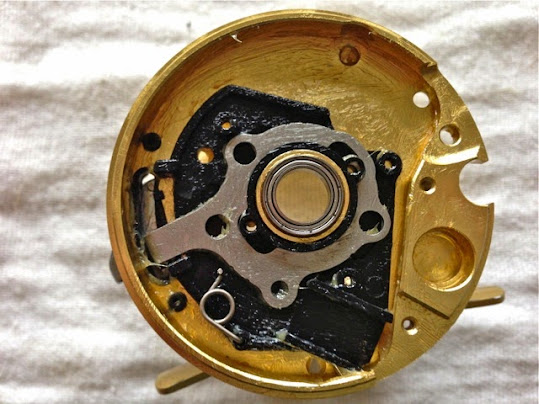
Carefully coat Right Sideplate with 2-4-C marine grease to prevent corrosion, but take care not to get any grease into the Antireverse Clutch Bearing #36.
Oil Small Pinion X-Ship Support Bearing #33 with CorrosionX and install. Bearing size is 9 x 5 x 3mm (OD x ID x thickness)
There’s a Delrin plastic separator #32 to keep Spool Bearing #31 apart from Small Pinion Support X-Ship Bearing #33. Install with these notches facing the Small Pinion Support X-Ship Bearing #33.
Lubricate the Hedgehog Ceramic Spool Bearing #31 with your favourite dry lube and install. Due to their tight tolerances and micro balls, these Ceramic bearings spin best on the lightest oil.
Snap in Retainer Circlip #30.
Drop a drop of CorrosionX to oil the threads and install Cast Control Knob #24.
Oil Anti Reverse Clutch Tube #38 with CorrosionX and mate its castellated end with key slots in the Drag Pressure Plate #39.
Lightly grease Copper Washer #22 and install.
Drop two drops of CorrosionX into the Antireverse Clutch Bearing # 36 and fit Right Sideplate over Frame.
Apply marine grease to the threads of 3 screws #80, #77 and #75 and secure the sideplate.
Seat plastic See-Through Window #35 sharp end first.
Secure with short screw #1.
Drop a few drops of CorrosionX oil and work it into the Big Drive Shaft Bearing #23 (12 x 8 x 4.5mm OD x ID x thickness) and install.
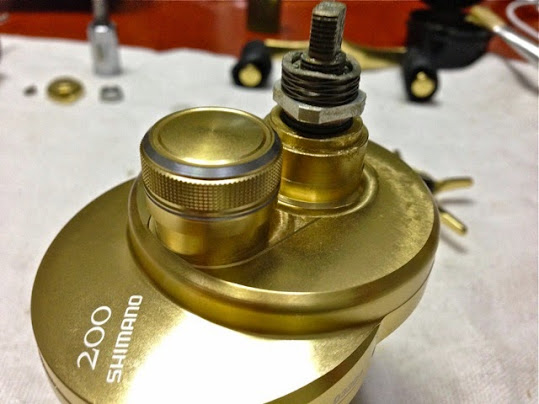
Drop in copper washer #22.
Grease and install Belvielle Spring Washers #21 with their concave sides facing each other.
Grease and install Double Sided Washer #20 with the copper side facing Belvielle Springs #21.
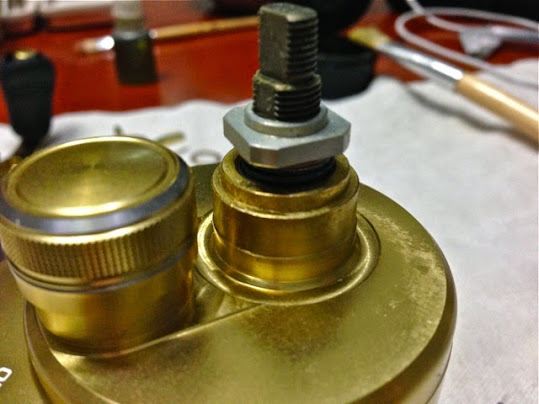
Grease the threads of Drive Shaft #44 and screw in Star Drag Nut #19.
Before you put in the Star Drag Spring #18, temporarily fit on the Star Drag #16 to ensure the Star Drag Nut #19 and Drive Shaft #44 aligns with its key slot. Remove and place in Star Drag Spring#18.
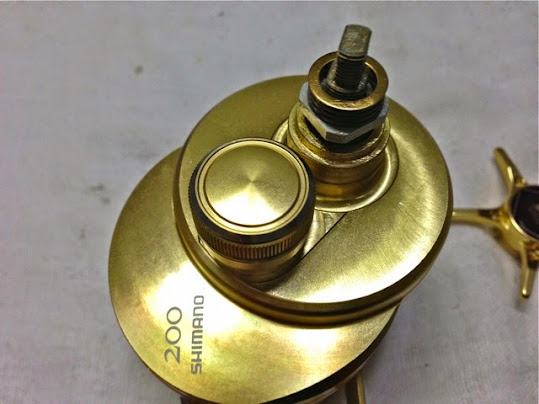
Grease and install Washer #17. Also take this time to grease Handle #10 and Handle Nut #3.
Oil Insides of Star drag clicker mechanism #13, #14, #15 with CorrosionX and install Star Drag #16, taking care the keyed slot aligns with Drive Shaft #44 and Star Drag Nut #19. Maintain pressure to keep from springing apart.
Place in Handle #10 that you had already pre-greased.
Secure with Handle Nut #3. Note there are two dots punched into the Handle #10. They are used to align the Handle Nut #3 so that the Handle Lock Cap #2 can fit in.
Oil the Handle Lock Cap #2 with CorrosionX and install. If it is difficult to fit in, remove and align Handle Nut #3 such that one point of the nut is pointed at any of the two dots. Do not Force Handle Lock Cap #2 into its home as it will become impossible to pry out without damage.
Secure Handle Lock Cap #2 with Screw #1 whose threads you lubricated by marine grease. Install S3D Spool #81 and Palming Sideplate #100 and your reel is assembled. Finally wet a rag with some Simple Green and wipe away excess grease from the outsides of the reel.
Your reel is serviced! Enjoy!.
HTH,
LL
I hope this step-by-step guide helped you in servicing your own reel too. If you found this useful, please click the blue LIKE and FOLLOW buttons. If you would like me to help you service your reel, or if you would like to help me with the cost of keeping this blog running, please drop me a message via WhatsApp at +65-9431-0400. Thank You!
©Lawrence Lee
All Rights Reserved
If you want to use any content for your own publication/web/blog, please write me @ LawrenceLee_TC@yahoo.com

Hi Sir, we cannot thank you enough for putting this detailed write up, I cannot begin to explain how much this helps a lot of us.
I have an issue I couldn’t seem to resolve for quite few years. This a JDM 2015 CTCQ 201HG. The clutch seems to be a little sticky, if I depress it slowly I can feel it’s not going down in one smooth motion, but seems to struggle pushing up the clutch cam and yoke.
I noticed its glass smooth when I depress the clutch bar, with the side plate removed, essentially when there’s no tension on the clutch area. I pressed and held down the pinion gear and depressed the clutch bar and felt the same resistance which I felt before opening the reel. I do not feel this resistance on my other CTCQs. I’ve replaced the 0133 jdm part, the little spring, but it doesn’t help. I’m considering replacing the clutch cam, and clutch yoke. Anything that comes to your mind? I hope you get sometime to help me here.
Regards
Om.
Check the 2 ball bearings that support the pinion aren’t rusty
Thank you Sir, the bearings are in good shape. I feel that resistance even without the side plate (bearings are out of picture), when I apply light pressure on the pinion gear and depress the thumb bar (simulating a closed reel), The friction seem to be in clutch yoke and cam. Tried greasing them, but no help. Thank you for answering!
Hello Sir
I have the 400 Conquest and suffers from no drag or very little drag when I’m out fishing in the cold. No issues on warm days. Got any leads to what might be the issue is?
Thank yoi
Try service your drag and if that don’t work, try using 2 washers for #22
Do you know if the grips from a Shimano Calcutta 200 HG or PG would fit onto the Shimano Calcutta 200d. Thanks
Hello, great pictures and descriptions. I have done my Calcutta 200D and Calcutta 400D. The Calcutta Conquest 200 has me very puzzled. I can’t figure out how to get what I call the “outside case” off. The spool removal is easy. I removed screws #1, #75 and #77 covering. Not sure what else I need to do to get at the drag washers I want to change. Any help would be appreciated.
Follow the steps of my guide backwards would help you strip apart your reel.
Hi, am looking for a round baitcaster reel, and have decided on the conquest (200/300 size not yet determined but 300 has the 2018 model so…..) vs the ryoga 18. Do you have any thoughts on this, and which you would prefer? Friends have advised me that the 18 ryoga is not built to handle tougher fish and would at most be suited for the peacock bass in SG. I personally would like a reel that can handle most fishing applications. Targeting toman, and the occasional grouper. Thanks!
in my opinion, the standard Conquest 200 is good enough for peacock bass, snakehead and even Grouper crankbaiting.
Hello Lawrence. First off Thank you for blessing us all with your knowledgeable guides and steps to protect our costly investments. I have a calcutta i serviced and followed your guide to reassemble grease and oil. I fish on the beach and occasionally get splashed. A few times i will dunk the reel on accident. What would you suggest i do if i dunk the reel? Would i have to fully take all of the grease off and start the process all over again?
I would definitely take the reel apart, degrease it and re service from scratch if mine is dunked in salt water. That’s because salt water will be mixed deep into the grease while I reel in line with the grease wet from sea water.
Marine grease and Salt-X can only do so much in protecting reel internals from corrosion. One must also realise that grease dries up and loses its protective ability with time. So annual full servicing rituals are de rigueur, more frequently if you use the reel often under stormy conditions…
Hope that helps,
LL
Thanks for answering on my behalf Terry, I must have gotten distracted while approving Eason’s comment and had forgotten all about it until you replied. Appreciate your help. 😁
Hi there, can I have the dimension for both bearings that you replace with hedgehog studio bearing for more casting distance ?
Not sure why Lawrence has not responded !
The size of the 2 spool support bearings are 3x10x4 (IDxODxWidth)
thank you guys haha
Thank you very much for the info . Tight lines.
HI, do the conquest perform nicely after 2 years of usage ?
Yes, but I have replaced the worn out Hedgehog spool bearings twice, and I’ve also replaced the main gear and pinion with a faster ratio from the Ocea Conquest. Otherwise, it’s still all original condition.
Thanks for the reply, is that the 4.8 gear ratio gear in ocea conquest also have bigger gear teeth compared to conquest ?
Offhand I can’t remember the ratio. However, the pitch of the gear teeth is rougher than that of the CQ 200.
I did that many years back, when there was no HG version of the CQ200. I think you would be better off if you looked at adapting the gears of the CQ200HG now-a-days .
Mr. Lee, you are a gentleman and a scholar sir. Thank You for your write up again and responding to the TT forum post. I just got off the phone with Shimano Support and it turns out the this issue has finally gone up the ladder and someone has heard my complaint. What they are going to do is ship me a Trinadad 10A (part# TGT1750) – drag washer that will replace the BNT3915 in the CTCNQ200 which they say will resolve the issue with the plating coming off the anti reverse ratchet. I think I may be the first customer to test this solution. In any case, I will share my results in about a month. A side note, I did mention the Ocea Conquest ratchet to the Shimano rep and he said that the Ocea Ratchet is not the same size (its a half mm larger). Did you also change out the entire drag stack?
Another side question, do you know off hand if the anti reverse dog can be installed from Ocea Conquest to CTCNQ200? I would love this feature as a back-up.
If I had to do it all over again I would have just waited and bought the Ocea Conquest 200 HG, but you live and learn. I still do love the reel and the 2 older generation Calcuttas that I have.
Hope it work well for you Snook Slayer, but the #TGT1750 is a drag washer and NOT the ratchet. When you abrade the black coating of the ratchet long enough despite replacing this washer, the coating will logically still wear out eventually.
I have replaced the main drive and pinion of my CQ200 with that from an Ocea Conquest 200. As a result of the larger inner diameter of the HG main drive, I also needed to replace the drag washers etc. I replaced the following:
#125 Main Drive
#46 Piston
#47 Spring
#48 White Plastic Base
#45 Keyed Stainless Washer
#44 Eared Stainless Washer
#41 Drag Pressure Plate
#42 Black Plastic Clicker Plate
#129 Pinion
I cut my own leather drag washers instead of buying the Ocea Conquest washers (#50 and 3 pieces of #43). This way, I am able to get a heavier max drag without increasing the thickness of the whole drag stack. If you don’t have access to leather sheets, you can contact Dawn at Smoothdrag.com and ask her for thin sheets of the old Super Smoooothies. They work well too.
I didn’t replace the ratchet # 51 as I didn’t feel the cost to replace the drive shaft #126 is justifiable in my case.
You can’t fit a supplementary AR dog #82 to the CQ200 as you’d need to drill a hole into the frame to install a post for the AR dog to swing on. So unfortunately, that limitation also is the reason why I didn’t wanna increase drag pressure too much on this reel, for fear of breaking the AR Roller clutch bearing.
HTH,
LL
“Hope it work well for you Snook Slayer, but the #TGT1750 is a drag washer and NOT the ratchet.” <–yes sir….this was Shimano's proposed solution, sorry I should have been more clear. So using the existing CTCNQ200 anti-reverse ratchet BNT5025 and replacing the original drag washer BNT3915 with the larger Trindad drag washer TGT1750. Again, I dont know if this solution has been tested by Shimano of if I am the test dummy.
I would be interested to know if the 2015 Conquest 200HG (6.2) utilizes the same anti-reverse ratchet(the problem part) and whether it has the anti reverse dog. I cannot find the schematic online for the life of me. Please keep us posted on when you get your hands on this reel.
Oh and lastly, the Ocea Conquest is not quite a perfect replacement for the Calcutta Conquest — the longer jigging style handle and huge knob is not good for casting lures or working TOP water lures.
The reel also lack a fine adjustment for cast control which may be important to some people who use that to fine tune the reel for different lures’ weight and aerodynamic properties.
I like the narrower spool of the Ocea Conquest, but I dislike the wider clearance between spool and frame. Thin lines (PE 1.0) can get in between.
Dear Lawrence,
I want to also express deep gratitude for your excellent write on the Conquest 200. I have also experience the same exact problem that you described above with the Anti Reverse Ratchet BNT5025. I posted details on Tackle Tour (Calcutta Conquest(CTCNQ200) BNT5025 Anti Reverse Ratchet)about this but no one from Shimano has responded to my question about a replacement part. I looks like you have answered my question that the Ocea Conquest (stainless steel) ratchet will fit! Now if I can get Shimano US to send me one. I am being told by one of the Shimano reps that the BNT5025 is aluminum not stainless steel. So why Shimano choose this aluminum part on the US model and the stainless steel part on the OCEA I cannot understand.
Hi Snook Slayer,
Thanks for your kind words of encouragement. 😀
I’ve posted a reply to your thread on TT forum.
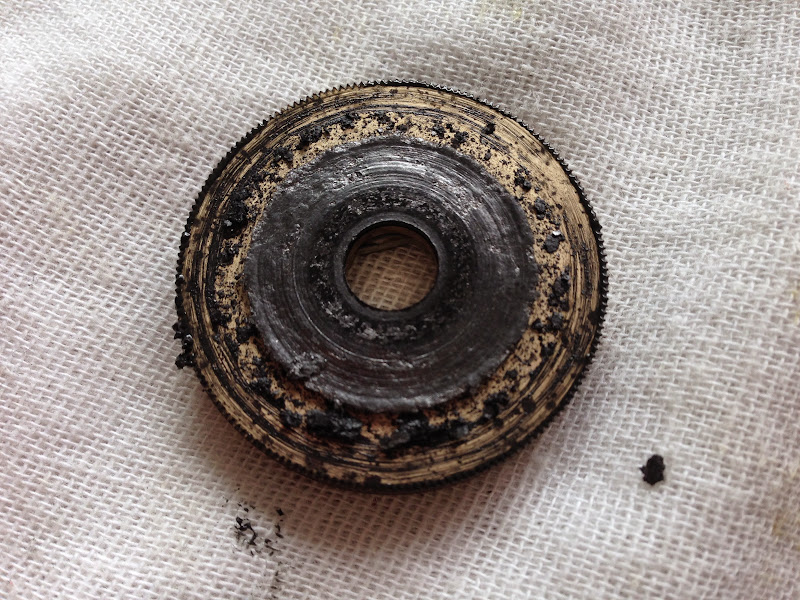
Yes, the 2014 CQ200’s spool return ratchet #43 is different from that of the Ocea Conquest’s #51. Yes the former will corrode, and the Dartanium drag piece will even fuse into the ratchet when a hard pulling fish is connected, (see photos in my comments on April 8, 2015, to jleefan above). OTOH, The latter reel’s ratchet has not seen any problem despite the many hard pulling fish it had landed. Neither does its carbon cloth drag piece fuse to the ratchet.
But here’s where the raison d’être for each reel form the spirit from which each part is formed and each metal chosen. The Calcutta Conquest 200 is more or less a casting reel (baitcaster) and light weight will be appreciated for such reels so that the user can cast lures with least fatigue all day long.
The Ocea Conquest on the other hand, is designed for light jigging. Here, weight is less of an issue, (compared to lure casting), as would the strength of its components and corrosion resistance since jigging is mostly associated with a marine saltwater environment. Also the Ocea conquest has a supplementary anti reverse dog which jams against this ratchet. Therefore it needs to be made of stronger metal to fulfil its role.
I hope this answer will help you understand why Shimano did what they did. I’m not a Shimano employee, and neither do I claim to be speaking on their behalf. But I surmised that the Engineers there must have thought along these lines when they designed each reel. So even though the two are nearly identical in specs, they have unique, purpose-designed internals and do not share the same parts bin out of convenience.
Now to your thoughts of swapping parts. The short answer is yes, the ratchet from Ocea Conquest is a direct drop in swap for the Calcutta Conquest 200.
You may even swap gear sets and the whole drag stack and springs while you’re at it! Then you will get more drag pieces, superior multi-piece carbon cloth drag washers that won’t stick or break, and clicking sound (if you like that) when line is pulled out!
However, if you wanna swap the ratchet #43, do consider changing the drive shaft #44 too. Galvanic corrosion happen most between a noble and a less noble metal.
Getting a stainless steel ratchet may render the lightweight CQ200’s drive shaft prone to galvanic corrosion unless you swap that with the Ocea Conquest’s drive shaft too.
Hope this addresses your queries. You can go to http://www.plat.co.jp to order the parts. That’s where I get mine from. It’s tedious as you can’t find it easily on their website. So it’s easier to email them, and circle the parts you need from a photo of my schematic. They ship efficiently and the packaging is typical Japanese packaging quality…
Good luck Snook Slayer, in your quest, and do write back to update how it worked for you. I always thrive on feedback and correspondence from those who visit. 😀
Dear Lawrence,
Great report, I enjoyed reading it very much.
I was thinking about obtaining a Calcutta Conquest 200 model. I was wondering if the CC 200 features an backup anti-reverse? My $200 Shimano Chronarch 200 (US/EU Model) had one, but I cannot find the part on any schematic for the Calcutta models.
So I figure it might be that they use a different mode of action for the backup anti reverse (I hope).
I couldn’t understand why they would omit that, but it seems that they did, because the OCEA Calcutta seems to have the classic backup AR mechanism that also was in my Chronarch.
So if they implement it in a average priced medium duty reel and leave it out in their premium heavy-duty-all-metal* reel it would be crazy. Especially as the anti reverse bearing can slip if it’s dirty or greasy. Loosing a fish because of that would be a pain.
Many thanks & best regards
Thanks for the kind words Lucas, it’s comments like yours that keep me motivated to post these step by step guides. 😀
The 2014 Calcutta Conquest 200 doesn’t have a backup anti reverse dog. It relies entirely on the one way clutch bearings to do anti reverse duties. It however also has a low drag power. So if a reel has not been modified to increase the drag power, and the AR rollers are oiled and not greased, it is unlikely for that bearing to fail.
The Ocea Conquest in reality has much higher drag power than what is officially published. That’s probably why it is equipped with a supplementary anti reverse dog.
One thing I’ve observed about Shimano Engineers’ philosophy — they use the minimum to achieve a purpose. Daiwa on the other hand, tend to over engineer their reels.
Hello Mr. Lee,
I’ve some confusing here. In order to replace the stock bearings under cast control knob, which bearing should i replace? #31or #33?
If you are replacing bearings for the spool, it’s #31
HTH
Oh i see. Thanks Mr. Lee for your quick reply 🙂
Hope that helps! 😀
Help! After servicing theres some issue with my cq201. When the drag setting is loose i can turn the handle smoothly. No problem at all. However, when i tighten the drag,the rotation of the handle require more effort to turn as well. What have went wrong?
Hi Clyde, did you place the parts back in order? If you did, my next question would be:
1) are you using back all your original parts or did you modify with some other part? Eg, if you changed drag plates, it may become too thick and press against the side plate cover, resulting in the stiff cranking you described.
2) if you are using back the original parts, then did you seat all parts into their grooves and slots? Eg, the anti reverse clutch tube #38 has a castellated side that fits into key slots on drag pressure plate #39. If it’s not seated properly, it may cause cranking problems as it will make the drag springs to be too Long.
Hi..ive just serviced my cq201..but theres an issue..after i tighten the drag..the handle seems to be tight too. I can feel theres something restricting the rotation of the handles inside but i cant pinpoint the fault.
Pls advise.
Hi,
Im using the Calcutta Conquest 101 2014. Ive followed your blog and serviced my reel.
Ive applied Marine Grease to the metal parts, Cals on the drags and oil the bearings
But somehow, during casting, the spool slows down. Ive compared to a another calcutta, same settings, before full service and the other calcutta’s spool doesnt slow down.
Ive opened my reel few times, cleaned the spool bearings, pinion gear, but still the same.
Why is that ?
Ive checked and oiled the brakes, the track etc
But ive yet to change the line, maybe line digging causing the spool to slow down, could be a reason.
Any advice ?
To eliminate causes such as line digging, line weight, bearing smoothness, test your friend’s spool in your reel to eliminate those variables.
If your friend’s spool also slows down, then the possible causes are grease contamination or oil that’s too viscous.
Hi!
Great work! Really nice documentation!
Thanks! 🙂
Hi Lawrence
Really hope you can do the video for this 2014 Shimano Calcutta Conquest step by step. I have try searching the video at you tube but cannot find the good one. I know if you do step by step it maybe take around 30 minutes. MAYBE. So it sure take time to upload the video. Maybe you can split it into several part. Looking forward for this video.
Thank you for this great guide of maintenance!
I own my CC 201 since a couple of days. Bought it from a friend. I fished it today and catched quite some pikes here in Sweden.
Great little reel!
But I think I have to speed up the gear. You wrote that the gearset from the Ocea HG fits into the body of the CC?
I guess I need the pinion, drivegear with all break discs. Do I also have to replace any springs under the star drag?
And at last: have you tried a complet conversion with your CC? If- is the reel still the same smooth?
Sorry. Many questions. I’m handy but not really a routined reelfixer 😊
This will be my first gearconversion.
Best regards
Mario
Hej Mario,
The Gear set from Ocea Conquest 200/201HG and Calcutta Conquest 200/201 HG look the same.
However, because the gear has thicker walls, your original drag washer from the CQ201 will be too big. You should order the gear set as well as the drag set together.
Good luck and do post back to let us know how your mod came out.
LL
Thank you for your answer!
I posted my questions although in the Shimano forum on Tackletour.
I’m a novice on ordering reelparts and hope for additional feedback from Shimano.
And I need both the schematic and parts/-number which are necessary for the conversion.
Furthermore: where shall I place my order?
Sorry, for all my questions.
I will happily discribe the conversion and post it on TackleTour.
Thanks again for your input!
Best regards
Mario
Hej Mario,
Email to: mail@plat.co.jp, Attention to Ogawa-San or Oshima.
Hope it helps
LL
Thanks again!
A friend of mine contacted me yesterday. He already did the conversion to HG with that set:
http://japantackle.com/tuning-parts/brake-gears-level-winder.html
Like you, and comparing the picture of the Ocea drive gear in your guide, he assumes that drivegears for CC 201 HG and Ocea HG are the same.
Easy to be sure if we had the partsnumbers.
He complains that he misses som dragforce efter the conversion.
I remember you wrote initially in the Ocea service about a stronger Belleville spring. Could that one be guilty? Because there is no Belleville spring in the conversion set from japantackle.
Would you be kind and post the partsnr from the drivegear and the Belleville from your Ocea? That would help throwing some light on this.
I will hunt for the numbers of the CC 201 HG.
Kindest regards!
//M
As far as I know, the 400 size reel was not in the 2014 line-up. The other models that had 2014 variants, now have higher gear ratios available in 2015. That is the only difference.
Pingback: SERVICING – Shimano Ocea Conquest 201HG | Gasping Gurami·
Thanks for doing this write up! What are you thoughts in terms of durability with more plastic parts in the new Conquest. I have seen a lot of people complain about the durability of the Calcutta D series compared to the original TE series. Do you prefer the new Conquest over the old one?
This 2014 Conquest has micro module gears. Although it is very smooth, it probably will not bear up to heavy drag for a very long time. Looking at how the micro module gear on the faster Ocea Conquest 200 HG sports larger teeth, I guess the finer teeth on this CQ could get worn down fast if you would modify the drag to get higher friction. Also, the Dartanium drag disc doesn’t like to experience long, hot runs. Mine fused to the Spool Return Ratchet #43 after a couple of fast runs by medium sized fish
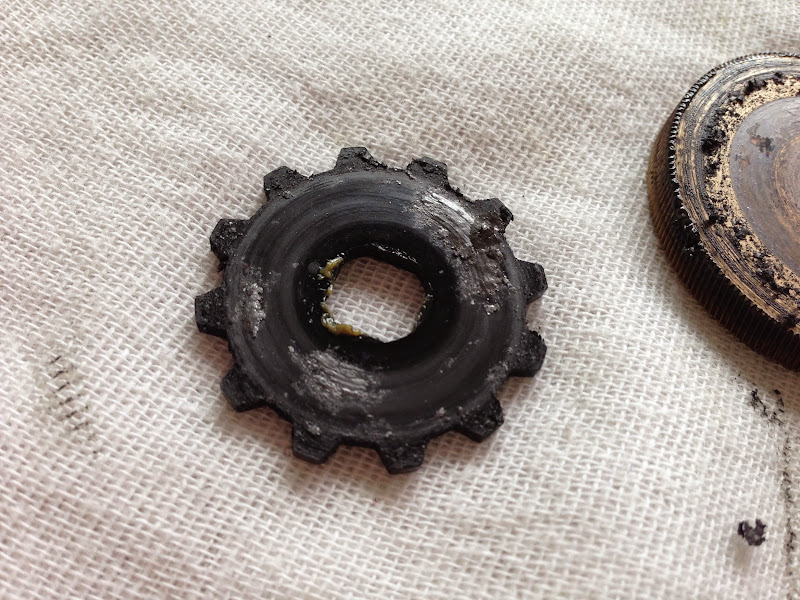

And the fish wasn’t really big…
BTW, the gear set on the Ocea Conquest 200HG is a direct drop-in replacemet. And you’d get a higher gear ratio, and more drag pieces:)
HTH,
LL
I just bought a new conquest 400, which is the 2015 series. Can I know the difference between 2015 and 2014 as Shimano stated the 2015 conquest is a new version
I’m sorry, I have yet to open the 2015 model CQ so I’m unable to tell what are the differences other than what has been stated in the Shimano marketing materials.
Hi Lawrence,
I just bought the new calcutta and open it up to service and apply marine grease before my outing this week.
Ive managed to put all parts together and seems to be working just fine. But is it normal that when i loosen up the cast control knob to almost maximum, and rotate the spool to see the how long is the spin time, theres a slight screeching sound…i think its because of the spool round edge touching the body of the reel…but only when the cast control knob is loosen to almost maximum…..when i tighten it up, it spins smoothly with no screeching sound…..i hope ive explained correctly…
i can send a video to you….
Thank you..
Lock back all centrifugal pellets and try. If the noise stops, it means you gotta add a thin oil to the golden race that these pellets run on.
Thank you for your reply and suggestion lawrence….i tried oiling the golden race, but the noise is still there…i went back to the shop and tried other calcutta, and all have the same noise when the cast control is loosen up to almost maximum.
Got over-worried thinking its a factory fault considering the amount i paid for the reel…
Thank you again Lawrence….
Hi Lawrence,
I have just obtained a new CQ14, 200, and wish to service it before use. I prefer to do this with all my new reels. Have been doing this for over 30 years, and service reels as a business, so I am capable.
I notice that you mention that the copper washer(22) goes above the clutch tube(38), and then again the same part number(22) above the big drive shaft bearing(23).
My reel, and the schematic only show one washer(22) that fits above the big drive shaft bearing(23).
Please advise if I am mistaken, or if Shimano may have changed things since you did this service.
Your response would be most appreciated.
Kindest regards,
Terry.
Hi Terry,
You have been very thorough in your observation!
Yes, I have an additional copper washer (#22) in my reel that was not drawn in the schematics.
If you look at the top right corner of the photo of all the parts laid out, you will notice there are two copper washers.
I lay the parts out on the cloth, in the order that I take them out. Then I take a photo of the whole bunch before I bring them off to the ultrasonic bath.
Hope that clarifies your question.
Best,
LL
Hi LL,
Thanks for the prompt response. I have looked at the photo, and do notice that the copper washer is there. Should be interesting to see if my reel also has this part, when I open it up. Shimano does state that the number of adjusting washers may vary, so that must be reason it does not appear on their schematic.
Whilst on this subject, I have already removed the spool bearings and, like you, replaced them with Hedgehog Studios Air Bearings. The original ones were cleaned in acetone in a US machine. Found that the stock bearings are not as good as I would have expected. Spin time is poor, when dry. Something that others may consider doing.
Best to you too.
Terry.